Latest Posts

About the food of Mexico

My first time to Mexico was all “rainbows and puppy dogs.” In fact, the only reason I got to go was because a co-worker broke up with his girlfriend and his two free tickets were simply passed down the line to me. A totally free vacation! In all my 27 years I had never won anything like this.

The scene was set for perfection.

There was just one catch: I found out on a Tuesday. The flight took off on a Thursday. There wasn’t much time to plan.

Keith (a.k.a. Mr Picky) – who had been my boyfriend of a just a few months – would be my companion. He had never left the country.

He didn’t even have a passport.

Thankfully, this was in the days before passports were required to enter Mexico. He simply had to track down his birth certificate.

This first trip to Mexico would be his initiation (at age 36) into the world “out there,” beyond the border.

Let’s just say I’d be watching for signs of an open mind and general willingness for Adventure.

I’m happy to report that I wasn’t disappointed.

We were scheduled to stay at the Hilton, which is exactly the type of place I would never stay at, if only because I could never afford it. In an effort to really live Mexico, we rented a car and happily trolled through the scrubby, cactus spiked hills of Cabo. We eventually made it all the way north to Todos Santos (supposedly home to the original Hotel California).

During this short but glorious trip, we ate great meals. I should add that none of them were at the Hilton. Instead we stopped at dilapidated food shacks, bulked up at the local grocery store, and had picnics on remote beaches and in our room.

The remote beaches could be peaceful or …. surprisingly exciting.

I’ve never seen waves like I did at this beach – I wish I knew its name (we found it between 15 donkeys and nowhere, without a map).

Speaking of donkeys, there were a lot of them. Some of my fondest memories include nibbling incredible fish tacos and guacamole while donkeys ambled through the sandy parking lot, just feet away.

While eating a fish taco was a first for me, the guacamole was a first for Keith (and my first real conquest over my stubborn Mr. Picky). He’d never tried guacamole until this trip – in fact, he flat out refused. The quality and flavor was so incredible, I told him he’d regret it his entire life if he didn’t try it. Perhaps a smidge dramatic, but it worked.

He has loved a good quality, chunky guacamole ever since.

Maps and flag courtesy of CIA World Factbook. Photo of La Paz, Mexico

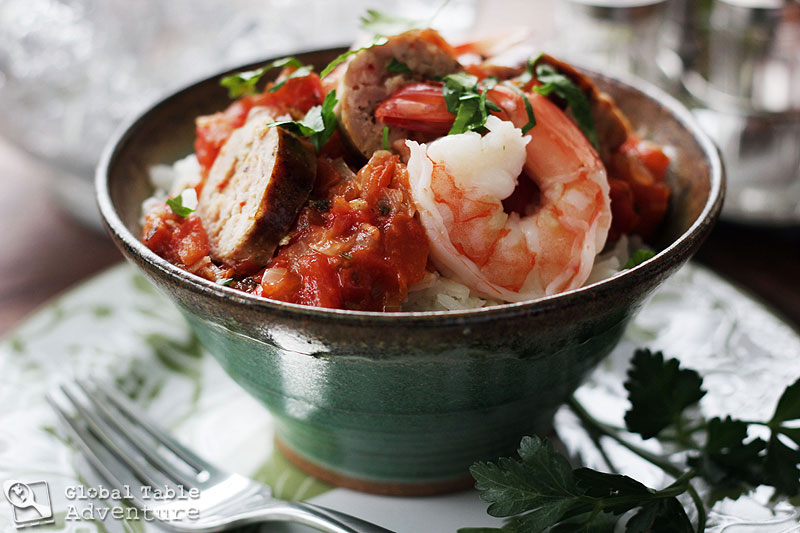
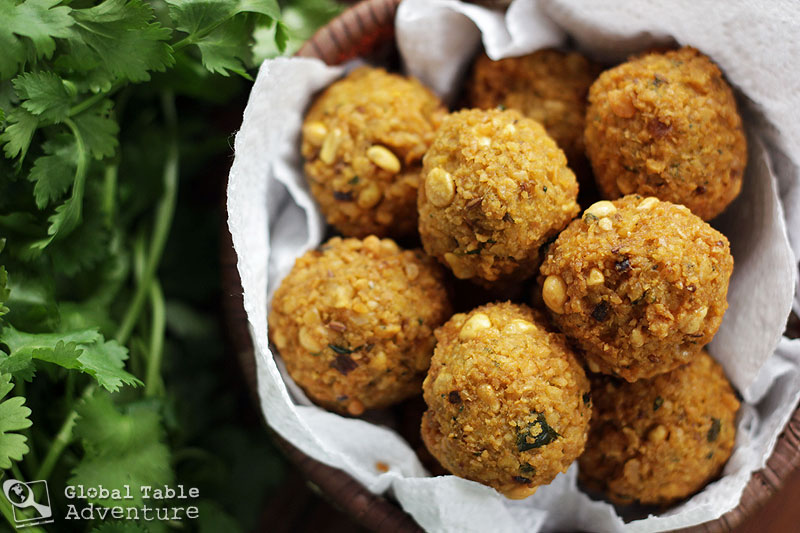
While there, we also had many a slow roasted meat, like pork al pastor. Enchiladas, tacos, burritos, tamales, and tortillas (wheat in the north, corn everywhere else [recipe]) were on all the menus. The base of most cuisine is corn and beans, roasted and smoked peppers (even in dips like rajas con crema [recipe]) with a healthy smattering of chiles, cilantro, oregano, and other herbs.

Even with all this goodness, I didn’t know very much about Mexican food. There are variations from north to south and east to west. I’d learn much later about the glorious Mole sauces of Oaxaca, which have many variations and whose roots trace back into ancient Mayan times.  The most popular is Mole Poblano [recipe] – a rich, hearty sauce made with a laundry list of ingredients, including dried poblano peppers, chocolate, and nuts.

We also failed to explore traditional Mexican beverages. The truth of the matter? On our first day, we shared a pina colada and loved it so much, we simply never ordered anything else. How I wish we would have sampled horchata [recipe] or some of the other fresh fruit juices sold on the streets of Mexico.

In 2008 we spent our honeymoon on the opposite site of Mexico, near Tulum. We thought it would be fun to explore a totally different part of the country. Instead of scratchy hills, this region is dense and tropical. We were surrounded by walls of jungle growth. And there were ruins galore.

Mexico will always be home to some of my happiest memories.

What is the best thing you’ve eaten from Mexico?

Have you ever been? Where did you go?

Monday Meal Review: Mauritius

THE SCENE: Photography Teaches

I step up onto the soft seat cushion and bend my head under the low ceiling.

Time to snap some pictures. I hold my breath, teetering over the banana tart, willing myself not to fall.

That’s when Keith pops in the room (he’s home to help care for our sick, feverish daughter) and snaps a picture of me (see above).

As I swivel my head to see what he’s doing I almost fall over, right onto the lattice work grid.

But before I can turn my head, he’s gone.

Finding myself in such a precarious situation gets me thinking about the lessons I’ve learned from photography.

Over the last few years I’ve learned that taking interesting photos is a lot like living a good life.

  • Every once in a while we must get new perspective – see the world through fresh eyes.
  • We must let the “light” in.
  • We have to care enough to try (again and again), even when things aren’t going the way we want them to.

For example:

I recently had a disagreement with someone. I was really tempted to walk away from the situation without resolving it. It just seemed too difficult. But this is reality. Arguments are reality.

In fact, our inability to solve these petty arguments are why we don’t have peace in the world. 

If we can’t fix problems with our friends, how can we hope to find understanding with people a million miles away?

So, instead of following my instinct and running away, I held my breath and faced the situation – teetering just on the edge of balance. In the process I…

  • got new perspective by putting myself in their shoes – I saw the world through their eyes.
  • surrounded my thoughts of them with the light of kindness and love.
  •  made time to work through the disagreement with understanding, even when I felt attacked.
And then there was one last thing.
  • I offered them a slice of Mauritian banana tart.
It worked like a charm. Time and time again, I’ve learned that sharing food is one of the best ways to diffuse problems.
Plus I’m a bear when I’m hungry – pretty much impossible to reason with.
Am I the only one?
THE FOOD

Ginger n’ Spice Tomato Sauce (Rougaille) [Recipe]

What I loved most about this dish:

Rougaille is a snap to throw together, even on a week night. Both Keith and I remarked on how amazing the flavors were – the bit of ginger, spices, and fresh herbs make for an outrageously good sauce… perfect with shrimp and sausage, although local Mauritians even enjoy it vegan-style: plain on white rice. Poor Ava, pretty well knocked out by the flu, still ate this dish.

What I loved least about this dish:

Not much. The recipe as I wrote it only makes enough sauce for one meal. Next time I’ll double or triple the batch so I can have leftovers to freeze.

Mauritian Chili Poppers (Gateaux Piments) [Recipe]

What I loved most about this dish:

The crispy crunch, coupled with earthy cumin and golden yellow turmeric is a comforting foil to the fresh springy flavor of green onions and cilantro. This is such a fun, “poppable” dish. Even Keith loved this. Who knew he’d ever say he liked something vegan and gluten free?

What I loved least about this dish:

I ate almost all of these, except for 3 which Keith and Ava shared. Whoops.

Mauritian Banana Tart [Recipe]

What I loved most about this dish:

This is has “baby’s first dessert” written all over it – ten bananas, a pinch of sugar (which can be left out), and a delicate lattice crust. Perfect. I loved it. Ava was too ill to try this one, so I’ll have to make it again sometime soon.

What I loved least about this dish:

Keith said it reminded him of baby food, although he did eat an entire slice.

Ava’s Corner:

Ginger n’ Spice Tomato Sauce | Rougaille

If there is one recipe that reflects the Mauritian potluck of global flavors, this is it. Rougaille. Let’s take a walk through the flavors of this unusual sauce – I have a feeling you just might make friends.

First, imagine a simple, homemade tomato sauce. The deep red goodness smells sweet and fresh. This sauce can be found in homes all across the world. Tomatoes, onion, garlic. Standard fare.

Until you take a bite.

Then you realize, this is more complex than you could have ever known. This “rougaille” is … unusual.

First, there’s a hint of the French influence – a smattering of parsley, thyme, and even the optional splash of white wine.

Then there’s the African influence – calling for hot chili peppers – as much as you can stand.

Finally, the flavors of India and remote parts of Asia are represented with bold layers of ginger and cilantro.

Outrageous and fine.

Serves 2-4

Ingredients

1 small onion, diced
3 cloves garlic, crushed or grated
1 tsp fresh, grated ginger
hot chili peppers, to taste
1/4 cup white wine, optional
3 sprigs fresh thyme, leaves stripped off the stem
3 sprigs fresh parsley
6 tomatoes, diced
salt & pepper

Serve vegan over rice, or with any combination of shrimp, chicken, fish, and sausage.

Method:

Cook onion in oil over medium heat until softened. Add the garlic, ginger, and chili peppers. Deglaze with white wine, if using.

Next, add remaining ingredients and simmer until thick and saucy all at once – about 3o minutes (more if you used wine). Serve over rice. I added browned sausage and shrimp for a bit of extra oomph.

Enjoy this daily Mauritian staple.

Let the flavors take you away… all the way to a summery sailboat dream.

Sailing in Mauritius. Photo by Mohammed Al-Naser.

Have a fantastic week, wherever you are in this great big world!

Ginger n' Spice Tomato Sauce | Rougaille
Votes: 0
Rating: 0
You:
Rate this recipe!
Print Recipe
If there is one recipe that reflects the Mauritian potluck of global flavors, this is it. Rougaille. Let’s take a walk through the flavors of this unusual sauce – I have a feeling you just might make friends. First, imagine a simple, homemade tomato sauce. The deep red goodness smells sweet and fresh. This sauce can be found in homes all across the world. Tomatoes, onion, garlic. Standard fare. Until you take a bite. Then you realize, this is more complex than you could have ever known. This “rougaille” is … unusual. First, there’s a hint of the French influence – a smattering of parsley, thyme, and even the optional splash of white wine. Then there’s the African influence – calling for hot chili peppers – as much as you can stand. Finally, the flavors of India and remote parts of Asia are represented with bold layers of ginger and cilantro. Outrageous and fine.
Servings Prep Time
2-4 people 15 minutes
Cook Time
30 minutes
Servings Prep Time
2-4 people 15 minutes
Cook Time
30 minutes
Ingredients
  • 1 small onions , diced
  • 3 cloves garlic , crushed
  • 1 tsp ginger root (freshly grated)
  • hot chili pepper , to taste
  • 1/4 cup white wine , optional
  • 3 sprigs thyme , stripped
  • 3 sprigs parsley , freshly chopped
  • 6 tomatoes , diced
  • salt
  • pepper
Servings: people
Units:
Instructions
  1. Cook onion in oil over medium heat until softened. Add the garlic, ginger, and chili peppers. Deglaze with white wine, if using.
  2. Next, add remaining ingredients and simmer until thick and saucy all at once – about 30 minutes (more if you used wine). Serve over rice. I added browned sausage and shrimp for a bit of extra oomph.

Mauritian Chili Poppers | Gateaux Piments

If you have a hankering for a munchin’, come with me via “stove top travel” to Mauritius. While there, we’ll cozy up, picnic-style, with a basket of Gateaux Piments. These crisp, crunchy poppers are quite a bit like falafel and I got to try them thanks to you, dear readers, since they won your vote on our Facebook Fan Page as the split pea recipe you’d most like me to try.

(Thank you!)

What I find most exciting about these chili poppers is their intense, fresh flavor. Each bite reveals earthy nips of cumin seed, springy green onion and cilantro sprigs, all tossed around in a golden tumeric glow.

These “gateaux piments” would taste fantastic on any salad but, if you want to be totally authentic, try them sandwiched inside a buttered baguette [recipe], perhaps while overlooking the laughing horizon.

Talk about epic comfort food.

Mauritius by SvG

Makes a dozen 1 1/2 inch balls

Ingredients:

1 cup yellow split peas, soaked for 4-8 hours
1/2 tsp cumin seed
3 sprigs cilantro, chopped rough
1 green onion, chopped rough
1/2 tsp turmeric
fresh chopped chili pepper, as much as you can stand (I only used 1/2 an Anaheim for “mild”)
salt

Method:

I used yellow split peas and soaked them for just over 4 hours.

Meanwhile, I daydreamed my way to Mauritius and imagined I was smiling in a sunny landscape.

Mauritius. Photo by Simisa.

While there, I roughly chopped up my green onion and cilantro. I also minced my hot pepper.

Next, I added half the split peas into a blender (or food processor) with the cumin seed (and any other ingredients you’d prefer pulverized). Pulse into a fine consistency, stopping often to scrape down the blender bowl.

(Note: I used a blender, but due to the thick consistency of this mixture, I’m thinking a food processor would be easier if you have one)

Now the fun part. Add the remaining split peas along with the  green onion, cilantro, chili pepper, turmeric, and salt. Pulse until just combined and still a bit chunky. Scrape down the sides as needed.

Breathe in the glorious goodness.

Now, let’s get cookin’.

Heat up enough oil in a pot to deep fry (about 350F)

Meanwhile, shape the mixture into small balls.

Nifty Tip: Have one dirty hand, to grab the mixture out of the blender and to do the rough shaping. The other hand will be your “clean” hand and you can use it to do the final shaping. Keep a bowl of water handy to dip your “clean” hand in. This will keep the mixture from sticking to you.

Fry in batches until golden and cooked through. This took 4-5 minutes for me, but cooking times may vary. 

These are goooood, with or without the buttered baguette.

In fact, I could hardly wait until they were done to start munchin’.

Enjoy these little glowing poppers under a brilliant glowing sun.

Sunset in Mauritius. Photo by Simisa

Have a beautiful Friday, friends…

… and a peaceful weekend.

Mauritian Chili Poppers | Gateaux Piments
Votes: 0
Rating: 0
You:
Rate this recipe!
Print Recipe
What I find most exciting about these chili poppers is their intense, fresh flavor. Each bite reveals earthy nips of cumin seed, springy green onion and cilantro sprigs, all tossed around in a golden tumeric glow. These “gateaux piments” would taste fantastic on any salad but, if you want to be totally authentic, try them sandwiched inside a buttered baguette
Servings Prep Time
12 1 1/2" poppers 15 minutes
Cook Time
4-5 minutes
Servings Prep Time
12 1 1/2" poppers 15 minutes
Cook Time
4-5 minutes
Ingredients
  • 1 cup yellow split peas , soaked for 4-8 hours
  • 1/2 tsp cumin seeds
  • 3 sprigs fresh cilantro , rough chopped
  • 1 green onion , rough chopped
  • 1/2 tsp ground turmeric
  • 1/2 Anaheim pepper (for mild), or to taste
  • salt
Servings: 1 1/2" poppers
Units:
Instructions
  1. Add half the split peas into a blender (or food processor) with the cumin seed (and any other ingredients you’d prefer pulverized). Pulse into a fine consistency, stopping often to scrape down the blender bowl. (Note: I used a blender, but due to the thick consistency of this mixture, I’m thinking a food processor would be easier if you have one).
  2. Now the fun part. Add the remaining split peas along with the green onion, cilantro, chili pepper, turmeric, and salt. Pulse until just combined and still a bit chunky. Scrape down the sides as needed.
  3. Heat up enough oil in a pot to deep fry (about 350F) Meanwhile, shape the mixture into small balls.
  4. Nifty Tip: Have one dirty hand, to grab the mixture out of the blender and to do the rough shaping. The other hand will be your “clean” hand and you can use it to do the final shaping. Keep a bowl of water handy to dip your “clean” hand in. This will keep the mixture from sticking to you.
  5. Fry in batches until golden and cooked through. This took 4-5 minutes for me, but cooking times may vary.
  6. These are goooood, with or without the buttered baguette.

Mauritian Banana Tart

Don’t let the startling geometry fool you. Today’s Banana Tart is for those who like mellow desserts. Big bites of health. An entire banana tree in the belly, topped off with delicate lattice goodness.

I know. It’s craziness.

You can thank the dreamy island of Mauritius, way out in the Indian Ocean, for teaching me this ingenious way to use up ripe bananas. The ingredient list is so simple and pure, I almost can’t believe it. Bananas, barely a smattering of brown sugar, a pinch of salt, and a vanilla bean.

That’s it.

Let’s just say I’d be proud to serve this tart to the tiniest tot.

Now, if you’ll kindly excuse me, I’ll be in the corner, daydreaming about going back in time so I can bring this tart to Ava’s first birthday party. The dense mashed banana would have made a fantastic, healthy first birthday “cake” (you could probably even leave the sugar out without harming the taste – just use very ripe bananas).

P.S. If you’d rather, you can always fly to Mauritius, where you’ll find tray after tray of the pretty tarts in the local bakeries. Just save me a few.

Port Louis, Mauritius. Photos by Simisa & Thierry

Ingredients:

1 recipe prepared pie dough

10 bananas
4 tbsp brown sugar (more if bananas aren’t very sweet)
scrapings of 1 vanilla bean
pinch salt

red, blue, and yellow food coloring (optional)

egg wash:

1 egg, beaten with 1 Tbsp water

Method:

Get your monkey fingers ready. We’re going to peel a bushel of bananas. Place the peeled bananas in a large mixing bowl.

Next, scrape out the vanilla bean and add its black, sparkling caviar to the bananas along with the brown sugar and a pinch of salt. Enjoy the glorious aroma. Smile.

Now, mash everything together a bit (you can leave the bananas somewhat chunky). Then cook the mixture in a pot over medium/low heat for  20-30 minutes, or until quite dried out and thickened. Stir frequently to avoid burning, lowering heat as needed.

In a small bowl, mix together one drop each of the red, yellow and blue food coloring to make brown. Adjust as needed to get the exact color you’d like. Then, stir the color into the banana mixture – a little at a time – until darkened enough to stand out from the wheat-colored crust.

Preheat the oven to 350F and set the banana mixture aside to cool slightly. Meanwhile, roll out 1/2 the prepared pie dough and line the bottom of an 8″ tart pan.  Add the banana filling, using a spatula to smooth the top of the mixture as much as possible (it is nice if the tart has a slightly domed shape).

Next, roll out the rest of the dough and, using a ruler, cut long strips.  

Criss cross the strips over each other without stretching the dough. If you stretch it, it will spring back while baking and pull away from the edges when baked. Use your thumb to seal each strip against the edge of the tin and press off extra dough.

Don’t forget to nibble the extras. I won’t tell.

Brush with egg wash and bake until golden (about 45 minutes).

I like this tart any which way – warm, room temperature or chilled. It’s all good.Enjoy, and if you have a sweet baby to share the tart with, even better.

Happy bananas to you!

Mauritian Banana Tart
Votes: 0
Rating: 0
You:
Rate this recipe!
Print Recipe
The ingredient list is so simple and pure, I almost can't believe it. Bananas, barely a smattering of brown sugar, a pinch of salt, and a vanilla bean.
Mauritian Banana Tart
Votes: 0
Rating: 0
You:
Rate this recipe!
Print Recipe
The ingredient list is so simple and pure, I almost can't believe it. Bananas, barely a smattering of brown sugar, a pinch of salt, and a vanilla bean.
Ingredients
  • 1 prepared pie dough
  • 10 bananas
  • 4 tsp brown sugar , more if bananas aren't sweet
  • 1 vanilla bean (scrapings)
  • 1 pinch salt
  • red food coloring , optional
  • blue food coloring , optional
  • yellow food coloring , optional
  • 1 egg beaten
  • 1 Tbsp water
Servings:
Units:
Instructions
  1. Peel bananas and place in a large mixing bowl.
  2. Add brown sugar, salt and vanilla bean scrapings to the bananas and mash together.
  3. Cook the mixture in a pot over medium/low heat for 20-30 minutes, or until quite dried out and thickened. Stir frequently to avoid burning, lowering heat as needed.
  4. In a small bowl, mix together one drop each of the red, yellow and blue food coloring to make brown. Adjust as needed to get the exact color you'd like.
  5. Stir the color into the banana mixture - a little at a time - until darkened enough to stand out from the wheat-colored crust.
  6. Preheat the oven to 350F.
  7. Set the banana mixture aside to cool slightly.
  8. Meanwhile, roll out 1/2 the prepared pie dough and line the bottom of an 8" tart pan.
  9. Add the banana filling, using a spatula to smooth the top of the mixture as much as possible (it is nice if the tart has a slightly domed shape).
  10. Next, roll out the rest of the dough and, using a ruler, cut long strips.
  11. Criss-cross the strips over each other without stretching the dough.
  12. Use your thumb to seal each strip against the edge of the tin and press off extra dough.
  13. Brush with egg wash and bake until golden (about 45 minutes).

Menu: Mauritius

“When you visit a town and have not visited the market, you have not really visited the town”

So goes the saying in Mauritius, according to local Renee. This old saying means that by immersing ourselves in the food culture of a place, we arrive at the heart and soul of the town.

I totally agree and I would add that when we visit a country via stove top travel, we get glimpses of that soul, even from half a world away.  Although we cannot fly to Mauritius today to visit the market, we are welcoming the Mauritian spirit into our homes by making these simple dishes.

Mauritius. Photo by Simisa.

Chili Poppers (Gateaux Piments) [Recipe]
Mauritius’ finger lickin,’ crispy, crunchy answer to falafel. Made with split peas, chili peppers, green onion, a bit of cilantro and a dash of turmeric.

Ginger n’ Spice Tomato Sauce (Rougaille) [Recipe]
A sauce from three continents: tomatoes cooked with ginger, garlic, white wine, cilantro, and chili peppers. A melting pot of flavor from Africa, Asia, and Europe. Best served with shrimp, sausage, fish, or chicken.

Mauritian Banana Tart [Recipe]
Just banana, a little brown sugar, vanilla bean and pie crust. It’ll make your belly happy and your heart smile. Adults will eat it, babies will adore it.

*All recipes and meal review will be posted by Monday morning.

PS. Get your votes in… last chance! I’ll be closing the polls today by noon central.

Menu_vote-now

About the food of Mauritius

Panoramic photo of Mauritius, by Clément Larher.

Just when you feel isolated, remote, and alone – like no one can possibly understand the way you are feeling, geography comes to the rescue. Way out in the Indian ocean lives Mauritius – an African country even more remote than Madagascar and totally teeny, tiny. If you study this “dot” amidst the crashing waves, you’ll find crags and cliffs, turquoise water and rusty rainbow soil.

For all her solitude, she is so beautiful. So intricate.

How can we feel alone when this exists? It’s like the earth herself is giggling…

Seven colored earth in Chamarel, Mauritius caused by volcanic erosion. These rolling dunes are red, brown, violet, green, blue, purple and yellow. They never erode in spite of torrential downpours and adverse climatic conditions. Photo by Moongateclimber.

While I thought I would have trouble finding information on Mauritius, I could not have been more wrong. I learned on Food Safari that there is a healthy group of Australians who love and enjoy Mauritian food. In fact, there are entire restaurants there devoted to the food of Mauritius.

So what is so magnetic about this food that it has crossed an entire ocean and firmly implanted itself into the hearts of complete strangers?

An amalgamation of flavors. A delectable melting pot.  Take Indian food, African food, Chinese, and French food – shake it up all up with a few island smiles, and there you have it.

Mauritian kids. Photo by Avinash Meetoo.

One dish that shows off the melting pot of flavors is rougaille – a rustic tomato sauce prepared with ginger, hot peppers, and cilantro [Recipe]. Sometimes white wine gets splashed in as well. Talk about worlds colliding!  For most people this rougaille is daily fare and can be served plain with rice, or mixed up with fish, sausage, or chicken.

Then there are curries galore, and a list of Indian flatbreads and French baguettes [recipe] to enjoy alongside them. There are a boatload of Indian fritters [Recipe], sometimes stuffed inside a buttered baguette.

Mauritius. Photo by Hansueli Krapf.

It makes me smile to know that I am just as likely to find fried rice and spring rolls as curries and cassoulets. Perhaps this abundance and variety is what has captured the hearts of so many.

Let’s ponder it over dessert, shall we? We can enjoy tropical fruit or French pastries, including lattice laced banana tarts [Recipeand fruity napolitaines. Then maybe we can sit by the sea and sip a spot of juice, coffee, tea, or alooda (a cold milk drink made with basil seeds and thickened with agar agar).

Yummers.

Maps and flag courtesy CIA World Factbook.

Monday Meal Review: Mauritania


I was talking with someone the other day about what this Adventure is all about. She wanted to know if I really thought I could change the world by cooking a meal from every country.

“It just doesn’t seem realistic” she said.

I considered my answer, gazing at the puffy clouds dotted throughout the blue sky.

I immediately thought of our latest Global Table meal – Mauritania, in northern Africa. The week was all about food cooked more than once:

Stuffing simmered before roasting.

Couscous steamed twice before spooning.

Tea boiled four times before sipping.

While each dish was easy enough, there was a lot of waiting around. Of listening to the ticking clock. Of watching the birds sing and swoop just outside our window. Of talking and dreaming and talking some more.

Of taking the time to really see and hear each other.

After all, what else is there to do while cooking and recooking all that food?

“Maybe changing the world is as simple as slowing down enough to experience it,” I finally said, “to appreciate each other – to be present with each other, both locally and globally.” I finally said.

“You know – instead of seeing the world through our cellphones,” I quickly added.

We both laughed.

Just think of the wonderful chain reaction … if we could all slow down at meal time… if we would consider boiling our tea four times, or steaming our couscous twice.  We could use that time to talk to each other.

If, instead of just slurping down our tea (and coffee) in the car, on the way to the office, we actually noticed what we were drinking and who we were with.

“But you’re just one person.” she said.

“Yes, that’s true. I was. But not any longer. There are others.”

I told her how a movement is forming. The Knights of the Global Table are growing in number, all over the planet – regular people bringing other cultures into their own homes by way of stovetop travel. Simply by eating differently. Each time we bring another culture’s food to our table, we come closer to accepting them and their common humanity.

Who knows where it will lead. The good news?

“We care enough to try. And isn’t that enough?”

That same night I ran into this quote, from Dr. Seuss:

Let’s raise a glass to caring. And let’s give three cheers to the movement (because three is better than just one).

Are you cooking along with us? Have you tried some of the dishes? Many? A few? Do you have plans to, but haven’t gotten there yet? I love hearing from you and am always happy to hear how things are going. I welcome your stories!

THE FOOD

Rainy Day Cous Cous [Recipe]

What I loved most about this dish:

The texture of this couscous is divine. The rich hint of olive oil, delicately coating each grain, makes for the most luxurious side dish. Ava gobbled this one up, chanting “couscous, couscous, couscous” with every bite. Apparently it’s as fun to say as it is to eat. Since this meal, Ava tries to ask  for it for dinner, but she forgets the name, calling it “that yellow thing” (not sure where she got the “yellow” from). Keith, a.k.a. Mr Picky, enjoyed it as well and ate his fair share.

What I loved least about this dish:

Twice steamed couscous is a bit confusing the first time, if only because I was trying to decipher and adapt other people’s recipes. Thankfully, I believe I came up with a straightforward recipe which will be easy to make from here on out.

Mechoui Stuffed Leg of Lamb with Dried Fruit [Recipe]

What I loved most about this dish:

The rich, sweet fruit with the deep crusted lamb makes for an addictive combination. I chopped up the leftover lamb and added to a lagman shurpa inspired soup from Kazakhstan. Now that’s a true Global Table!

What I loved least about this dish:

I had trouble keeping the stuffing inside the leg of lamb when slicing the meat. I think next time I’ll simply bake the stuffing alongside the lamb, as we do with turkey stuffing. The flavor is fantastic.

Traditional North African Green Mint Tea [Recipe]

What I loved most about this dish:

Everything, everything, everything. To quote Mr Picky, “is there anything in this tea besides sugar?” While I don’t  normally go for super sweet drinks, the mint is so refreshing, especially after a heavy meal. It’s the perfect way to finish a meal and all the waiting around encourages great conversation. I hope to make this in a metal kettle around a campfire (or in my chimnea) soon. As for Ava – her thoughts were clear when, one sip in, we got the most fantastic grin.

What I loved least about this dish:

Just be careful of the glass teacups – they get hot, so try to underfill them so you have something to grab onto as you pour the tea in and out (and in and out again!).

Ava’s Corner

P.S. Don’t forget to vote in the polls and help decide our entire Mexican menu…

Menu_vote-now

Leg of Lamb with Dried Fruit Stuffing | Mechoui

I think I’ve easily quadrupled my lamb intake (for my entire life) during this Global Table Adventure … and we’re only halfway through).

Wowzers.

As for Keith, a.k.a. Mr Picky, he claims to have never even had lamb until this Adventure.

Today we’re tackling the lambiest of all lamb dishes – Mechoui, a dish enjoyed in Mauritania and nearby Morocco. Think “epic stuffed leg of lamb.” This Mauritanian version includes a sweet filling made with dried fruit and rice – a perfectly addicting way to perk up the intense gaminess of the roast.

While I found the dish absolutely delicious, I regret to say that “stuffing the lamb” didn’t work out as I had hoped. If this happens to you, please know that the filling is just as tasty roasted and served on the side of the lamb. No biggie.

Hamoni library in Chinguetti library (Mauritania). Photo by Ji-Elle.

Adapted from the World Cookbook for Students.

Serves 6

Ingredients:

1 leg of lamb – 3.5 -4 pounds
1/4 cup raisins
2 pitted dates, chopped
4 dried figs, chopped
1 onion, diced
1 cup rice, uncooked
2 1/2 cups stock
salt & pepper
1/2 tsp coriander

Method:

Chop the onion, dried fruits, and add to a skillet with rice, stock, salt, pepper and ground coriander. Cover and simmer for about 10 minutes. Enjoy the smell of sweet goodness.

Meanwhile, unwrap the lamb to prepare for stuffing and preheat the oven to 325F.

If you choose to stuff the lamb, lay slightly cooled rice and fruit mixture along the meat. Reserve extra rice stuffing in a casserole to bake.

Roll the leg of lamb back up and tie with butchers twine.

Roast for 2 1/2 to three hours (or 25 minutes per pound of meat plus stuffing, plus an extra 25 minutes for medium). Add the small casserole of stuffing in the last 30-45 minutes of roasting, covering if it seems to be drying out. 

Let the meat rest about ten minutes before slicing. 

Serve with extra stuffing and a smile. 

Enjoy with a beautiful view, perhaps along the “Road of Hope.”

Road of Hope, Mauritania. Photo by C.Hug

I love the sound of that…

May we all walk along the road of hope. Today and always.

Leg of Lamb with Dried Fruit Stuffing | Mechoui
Votes: 0
Rating: 0
You:
Rate this recipe!
Print Recipe
Today we’re tackling the lambiest of all lamb dishes – Mechoui, a dish enjoyed in Mauritania and nearby Morocco. Think “epic stuffed leg of lamb.” This Mauritanian version includes a sweet filling made with dried fruit and rice – a perfectly addicting way to perk up the intense gaminess of the roast.
Servings Prep Time
6 people 20 minutes
Cook Time Passive Time
3 hours 10 minutes
Servings Prep Time
6 people 20 minutes
Cook Time Passive Time
3 hours 10 minutes
Ingredients
  • 1 boneless leg of lamb (3.5-4 lbs)
  • 1/4 cup raisins
  • 2 dates , pitted
  • 4 dried figs , chopped
  • 1 onion , diced
  • 1 cup white rice , uncooked
  • 2 1/2 cups chicken broth - OR -
  • beef broth
  • 1/2 tsp ground coriander
  • salt
  • pepper
Servings: people
Units:
Instructions
  1. Chop the onion, dried fruits, and add to a skillet with rice, stock, salt, pepper and ground coriander. Cover and simmer for about 10 minutes.
  2. Meanwhile, unwrap the lamb to prepare for stuffing and preheat the oven to 325F.
  3. If you choose to stuff the lamb, lay slightly cooled rice and fruit mixture along the meat. Reserve extra rice stuffing in a casserole to bake.
  4. Roll the leg of lamb back up and tie with butchers twine.
  5. Roast for 2 1/2 to three hours (or 25 minutes per pound of meat plus stuffing, plus an extra 25 minutes for medium). Add the small casserole of stuffing in the last 30-45 minutes of roasting, covering if it seems to be drying out.
  6. Let the meat rest about ten minutes before slicing.
  7. Serve with extra stuffing.

Traditional North African Green Mint Tea


Do you have a steady hand? Can you pour tea from several feet up without shaking, spilling, or missing entirely?

If so, give me a call.

We’re going to need you.

We’ve got some frothy tea to make.

It’s going to be fun. In fact, quite possibly the most fun I’ve had on this Adventure to eat the world is when we try new teas. The effort is minimal, yet the flavor impact is huge.

Today is no exception.

Not only did we buckle up to try the super sweet “Morroccan-style” green mint tea served all over north Africa, but I took care to prepare it the traditional way, in small glass tea cups (available at Middle Eastern markets – 6/$6).  The trick is to cook the tea several times and pour the tea from way up high -about 2-3 feet. This creates a frothy top that looks, right after pouring, a lot like a tiny tumbler of beer.

And then there’s quite possible the most important part: the chitter chatter along the way. This is a social activity.

A time to connect and reconnect.

A time to daydream.

I got the idea to make this tea couple of weeks ago when I cooked Mali. Mette, a long-time reader, suggested it and sent me a link to the video at the bottom of this post. Unfortunately I was making bissap at the time, and the preparation is a bit different for hibiscus than for green and black teas. I knew, however, that I wanted to try the technique.

Thankfully I didn’t have to wait long. The same basic preparation is enjoyed in Mauritania. And, to be honest, I’m not sure I could have waited much longer to try it.

So, friends, let’s get ready to pour.

To quote Ava “higher, higher!”

NOTE: After the second boiling, you can pour the tea into a new kettle to “strain out” the tea leaves. I didn’t have a second kettle, so I didn’t worry about this step.

Serves 6-8

Ingredients:

6 cups water
2 Tbsp green/mint tea combo (think “Moroccan Mint”)
sugar (enough to fill 2 shot glasses), about 3/4 cup

Method:

Get excited. You’re about to have an amazing tea party.

First, gather a good quality loose leaf mint & green tea blend, or mix your own by combining green tea with a few fresh mint leaves.

Boil the tea in water for about two minutes. Let the mixture rest until all the tea leaves settle on the bottom of the kettle. Then pour it out. From really high up. This can take some practice. You might find it easier to start off low and raise the kettle as you pour.

Now, empty the cups back into the tea kettle and boil a second time for a couple of minutes.

Let rest again. Sit around and chit chat while you wait. Laugh a little. Then laugh a lot.

Pour the tea out again. It will be somewhat foamy on top.

Boil the tea a third time for about two minutes. Meanwhile, measure out 2 parts sugar (just fill two of your tumblers with sugar or, if presentation doesn’t matter simply measure out 3/4 cup). Add this sugar to the tea kettle, let the mixture settle, and pour the tea back out into the glasses.

Now (are you still with me?!) … pour the tea back into the tea kettle and boil a fourth and final time.

Let rest again, for maybe ten minutes.

Finally, pour the sweet nectar into the glasses.

Again, from way up high! The tea looks like golden, honey beer.

Higher, higher!

This is sweet, sweet, sweet.

Quite possibly as sweet as your baby-love.

And the flavor is immense. Like a sugar-filled dream.

Here’s a glass, especially for you:

Psst.. where would you most like your tea party? In a Mauritanian oasis, or along the “Road of Hope”?

Because wherever you’d like, I’ll join you. Together we can raise a glass (and a kettle) to life, love, and laughter…

… and, of course, to that which is near and dear to your heart.

UPDATE 7/3/12: Here’s how Ava has her tea parties now… our Adventure is definitely having an impact…

Photo: Ava parties like a north African. Look at that height!! http://instagr.am/p/MobPfmD77K/

Traditional North African Green Mint Tea
Votes: 0
Rating: 0
You:
Rate this recipe!
Print Recipe
The trick is to cook the tea several times and pour the tea from way up high -about 2-3 feet. This creates a frothy top that looks, right after pouring, a lot like a tiny tumbler of beer.
Servings
6-8 people
Servings
6-8 people
Ingredients
  • 6 cups water
  • 1 Tbsp green tea , to taste
  • 1 Tbsp mint tea , to taste
  • 3/4 cup sugar , as needed
Servings: people
Units:
Instructions
  1. First, gather a good quality loose leaf mint & green tea blend, or mix your own by combining green tea with a few fresh mint leaves.
  2. Boil the tea in water for about two minutes.
  3. Let the mixture rest until all the tea leaves settle on the bottom of the kettle.
  4. Then pour it out. From really high up.
  5. Now, empty the cups back into the tea kettle and boil a second time for a couple of minutes.
  6. Let rest again.
  7. Pour the tea out again. It will be somewhat foamy on top.
  8. Boil the tea a third time for about two minutes.
  9. Add sugar to kettle.
  10. Let the mixture settle, and pour the tea back out into the glasses.
  11. Pour the tea back into the tea kettle and boil a fourth and final time.
  12. Boil for two minutes and let rest again, for maybe ten minutes.
  13. Finally, pour into glasses from way up high. Enjoy.
Recipe Notes

This can take some practice. You might find it easier to start off low and raise the kettle as you pour.

Rainy Day Steamed Couscous

I’ve been putting off making couscous. I don’t mean the boxed, nearly instant kind – I make that fairly often. What I’m tackling today is delicate, fluffy steamed couscous. The kind  you buy in the bulk bin. The kind that fluffs up like a dream. According to Clifford A. Wright, steaming the tiny pearls twice, sometimes three times, is the “only” way to make proper couscous.

Color me intrigued.

While we’ve cooked many countries that enjoy couscous (Libya and Algeria for example), I put off making authentic couscous because I was… well… afraid of failure.

I have a tendency to do that when it comes to trying something new. I dance around challenge, especially when I’m tired. However, on quiet rainy days, when there is nothing else to do, I feel braver. Like I can accomplish anything. Be anything. That’s when I’m most likely to  buckle down and go for it in the kitchen. It’s like there’s a cloudy cushion surrounding me, making it okay. Turns out, Clifford A. Wright is on the same wavelength. He suggests, if it’s your first time, making steamed couscous a rainy day activity.

So that’s what I did. Finally.

Turns out making steamed couscous isn’t as complicated as I expected. In between steps I can work on other recipes, tidy up, or – my favorite – write a love letter. While using a couscousier would have been ideal, I managed to cobble together a perfect steaming device from my very own kitchen supplies. (I’ll get to that later in the recipe).

Serves 6

Ingredients:

2 cups couscous (not instant – buy it from the bulk section)
1/2 tsp salt
1/2 cup water
1/4 cup olive oil

Cheesecloth.

Optional additions:
1/4 cup raisins,
1 cup cooked chickpeas
chopped dates, figs, etc.

Method:

Think of couscous as edible dunes… drifting and dreamy.

Valley near Oualata (Mauritania). Photo by C.Hug

What a beautiful world.

Now, let’s get happy with couscous!

Step 1: Wet the couscous

First, rinse couscous in a large bowl of water. Drain and spread couscous over a double layer of cheesecloth (or a linen cloth) on a large large, flat tray or platter. This gives the couscous room to fluff up evenly.

Sprinkle evenly with salt, then let the grains swell for 10-15 minutes. Meanwhile heat up the water in the steamer.

Right before cooking, break up any lumps by raking through the couscous with your fingers.

Step 2:  Steam the cous cous

Safe couscous steaming is easy as 123: 1) Pot 2) pasta insert 3) vegetable steamer (remove center pin). Fill water only up to the pasta insert. The vegetable steamer will keep the couscous safely above any bubbling waters.

Using a steamer, couscousier, or colander/pot combo, steam the couscous (simply lift it into the steamer by the cheesecloth to make the transfer back and forth less messy. Gently steam, covered, for about 15 minutes.

While you wait, write a love letter. Address it to a friend, a partner, or yourself. Smile.

Step 3: Wet the couscous again

Now, lift the couscous out of the steamer by holding onto the cheesecloth and lay it all back onto your platter. Drizzle on a 1/2 cup cold water and …

… the olive  oil. Work it into the couscous, breaking up any lumps as you go.  You may
need to use a large fork to rake through the grains if it is too hot for your fingers. Let rest ten minutes. Break up any lumps.

You can add plumped raisins, chopped figs, dates, chickpeas, etc at this stage, if desired

Step 4: Second Steaming

Return the couscous to the steamer and cover. Gently steam until done – 10- 20 more minutes, and serve hot.

It’s yummy with lamb! Just ask Miss Ava.

Do you steam your couscous? Any other tips you want to pass on?

Have a beautiful, happy day!

Rainy Day Couscous
Votes: 0
Rating: 0
You:
Rate this recipe!
Print Recipe
I’ve been putting off making couscous. I don’t mean the boxed, nearly instant kind – I make that fairly often. What I’m tackling today is delicate, fluffy steamed couscous. The kind you buy in the bulk bin. The kind that fluffs up like a dream. According to Clifford A. Wright, steaming the tiny pearls twice, sometimes three times, is the “only” way to make proper couscous. Turns out making steamed couscous isn’t as complicated as I expected. In between steps I can work on other recipes, tidy up, or – my favorite – write a love letter. While using a couscousier would have been ideal, I managed to cobble together a perfect steaming device from my very own kitchen supplies. (I’ll get to that later in the recipe).
Servings Prep Time
6 people 15 minutes
Cook Time Passive Time
25-45 minutes 10-15 minutes
Servings Prep Time
6 people 15 minutes
Cook Time Passive Time
25-45 minutes 10-15 minutes
Ingredients
  • 2 cups couscous (not instant - buy it in the bulk section)
  • 1/2 tsp salt
  • 1/2 cup water
  • 1/4 cup olive oil
Optional additions:
  • 1/4 cup raisins
  • 1 cup chickpeas (cooked)
  • a few dates , chopped
  • a few dried figs , chopped
Materials:
  • Cheesecloth
Servings: people
Units:
Instructions
Wet the couscous
  1. First, rinse couscous in a large bowl of water. Drain and spread couscous over a double layer of cheesecloth (or a linen cloth) on a large large, flat tray or platter. This gives the couscous room to fluff up evenly.
  2. Sprinkle evenly with salt, then let the grains swell for 10-15 minutes. Meanwhile heat up the water in the steamer.
  3. Right before cooking, break up any lumps by raking through the couscous with your fingers.
Steam the couscous
  1. Using a steamer, couscousier, or colander/pot combo, steam the couscous (simply lift it into the steamer by the cheesecloth to make the transfer back and forth less messy. Gently steam, covered, for about 15 minutes.
Wet the couscous again
  1. Now, lift the couscous out of the steamer by holding onto the cheesecloth and lay it all back onto your platter. Drizzle on a 1/2 cup cold water and the olive oil. Work it into the couscous, breaking up any lumps as you go. You may need to use a large fork to rake through the grains if it is too hot for your fingers. Let rest ten minutes. Break up any lumps.
  2. You can add plumped raisins, chopped figs, dates, chickpeas, etc at this stage, if desired
Second Steaming
  1. Return the couscous to the steamer and cover. Gently steam until done – 10 to 20 more minutes, and serve hot.

Menu: Mauritania

Welcome to comfort food, Mauritania-style. Apparently this is exactly what my spirit needs. Remember yesterday, when I told you it had been raining for 24 hours? Well, the rain continued to fall all day and most of the night (and even this morning). This “popcorn in the sky,” as Ava calls it, is greening up the grass, feeding our trees, and preparing seeds to shoot up in time for spring. These are all good things. But, I’m feeling a little sleepy, a little bluesy, and, if you don’t mind, I simply need a few recipes to take the chill out of the air. Ironically, this menu is enjoyed in the hot sands of Mauritania. Let’s not question my logic. Let’s just make our tummies happy.

Mechoui (Leg of Lamb stuffed with Dried Fruit) [Recipe]
Roast lamb stuffed with rice, sweet figs, dates, and raisins.

Rainy Day Cous Cous [Recipe]
This vegan side dish is my take on authentic twice-steamed couscous. For all the complicated recipes out there, it is not as scary as it sounds. I even tossed a few chickpeas and raisins into the mix.

Traditional North African Green Mint Tea [Recipe]
What better thing to do on a rainy day than have a tea party? We’ve been doing that a lot lately. It’s winter and it helps pass the time until the days are longer. This particular tea is very sweet and made in the traditional manner (hint: I hope you have a steady hand!).

*All recipes and meal review will be posted by Monday morning.