I can’t stop thinking about those three girls that were found last week: Michelle Knight, Amanda Berry, and Gina DeJesus.
Also on my mind is Mr Ramsey, the man who stepped forward and kicked in the door to free the girls.
Friends, it is so important to step up when we’re called.
Is it scary? Yes.
Can it be dangerous? Yes.
But what else is life for, than helping each other?
I’m not by nature a hero. Once, when I was in my mid-twenties, I heard a man scream and groan next door. The sound was chilling, the urgency of the scream scraped up my spine, setting my every nerve on full alert.
My gut reaction was to duck away from the window, for fear of being attacked or worse.
Once on the floor, I called the police. They lit up the house next door in less than ten minutes. Nothing suspicious was found. No source ID’d for that scream.
Their findings didn’t sit right to me, but I let it go because, surely, the cops knew what they were doing.
Fast forward a few years, to this week.
Several of Mr. Castro’s neighbors (the man who held the three girls captive) have similar stories, and worse; unexplained screams, strange sights… all dismissed by the cops. If someone – anyone – would have dug a little deeper, they would have found three girls in there.
What a nightmare.
I’m realizing now, more than ever, we’re ALL responsible for each other; we can’t step back and hope someone else will step up.
If something doesn’t seem right, we need to trust our instincts, not brush them under the rug.
We need to act. Or find someone who will.
This is true, even when just a little help is needed.
A friend of mine, Sandy, has been going through a tough time lately. She’s had the feeling that “something was not right” with her husband for a while. Turns out, she was right. He’s been having an affair for years and lying to her face the entire time.
They’re on the fast track for divorce.
I knew I had to help her, if even in just some small way.
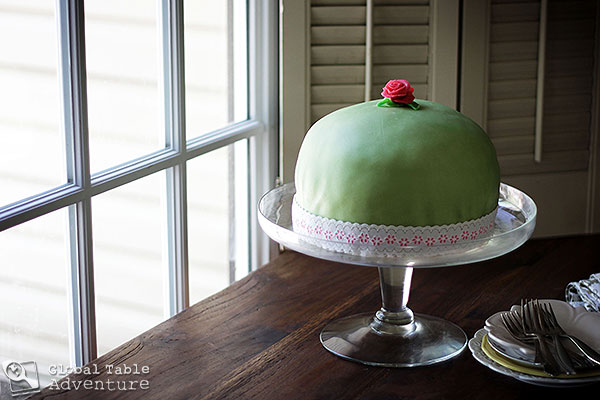
Enter Swiss Carrot Cake.
Let me explain.
While no divorce can be solved by carrot cake, it sure can smooth over the process.
Here’s how we used it: We gave 1/3 of the cake to a gal who gave us a stack of moving boxes to help Sandy move out. She needed the boxes for her move, but said she’d happily buy more boxes later if she could have cake now. The rest of the cake went to Sandy and us, on moving day. Between each box, there was a nibble, a bit of sugar to make us smile.
The cake comforted. The marzipan carrots were everyone’s favorites.
In extremely difficult times, we often don’t know how to help. We assume someone else is going to step up, or figure it out.
I’m here to say, sometimes, a slice of cake will do. I dare you to be the one to take charge.
And you just might lean on Switzerland to bring out the smiles.
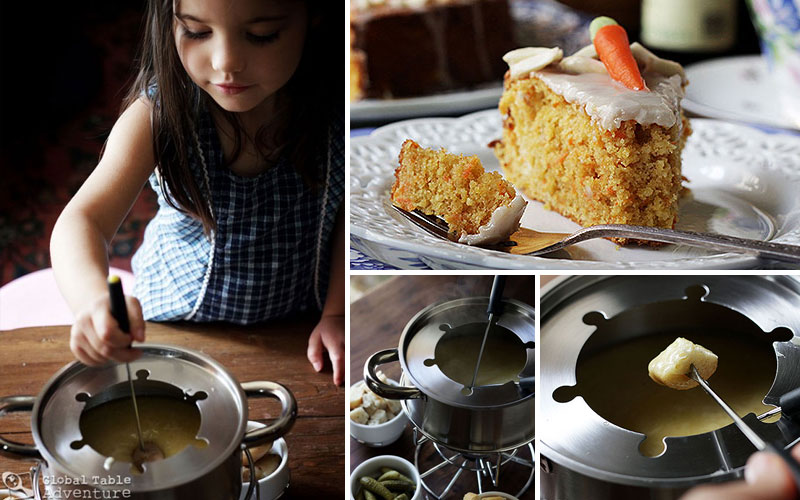
Though I’ve enjoyed fondue several times, I never tried to make it. I thought there would be a mess of ingredients, or that the steps to make it would be more temperamental. I was wrong. A basic recipe is super simple and, as long as you keep stirring, all will be well.
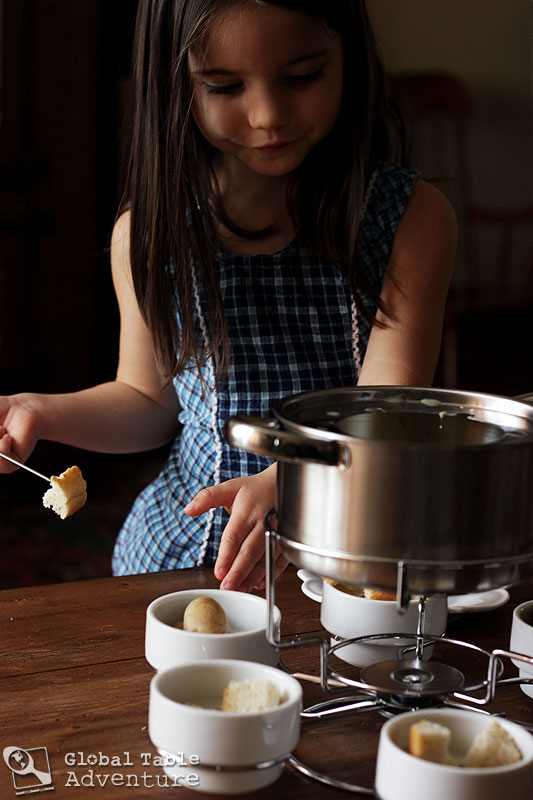
Both Ava and Keith really enjoyed dipping different foods, but my favorite moment when Ava asked me, “Where’s the broccoli mama?” Such a healthy girl!
What I loved least about this dish:
The cheesy goodness does tend to separate after a while, if you don’t keep stirring. This is not a big deal, during dinner, as the simple act of dipping bread and other items into it seems to keep the fondue relatively mixed. If you do let it cool a little too long, simply put it back over low heat and stir until it comes together.
Swiss Carrot Cake is light, healthy and, above all, springy. The almonds and marzipan carrots are a lovely touch. I also I loved that, other than the egg yolk, there is no fat in this recipe. Keith, who doesn’t like American-style carrot cake because of the cream cheese frosting, actually enjoyed this one. Ava ate the cake, but stopped when she ran out of icing. I guess lemon glaze is her favorite.
What I loved least about this dish:
Not much, although I think I’d prefer crushed almonds on the edges of the cake, instead of slivered. For a fancier occasion, I’d also press them against the side of the cake (using a little icing to stick them on).
If I had to face life or death, I’d choose Swiss Fondue.
Every. Single. Time.
This decision is purely based on personal experience.
A) I know that life gets better whenever I dunk hunks of rustic bread into ooey-gooey cheese.
To support my case, I must call attention to a fictional character: Heidi (does this help me or hurt me?). She knows all things are better with melted cheese because, apparently, this is the only thing she eats at her grandfather’s house, on the flower dotted Alps… and she is happier there than anywhere else in the world
B) If I’m faced with death, I’m willing to bet that, if I crack open a pot of fondue, Mr.Death would certainly realize they are no match for boozy cheese.
I’d like to think that, as he slunk away, I’d toss him a cube of cheesy bread for the road.
A peace offering of sorts.
Two days ago I wrote about my near death experience in the Swiss Alps and how Fondue is one of the few comfort foods that can bring a person back from the shock of such an event.
It’s also just a really cozy way to spend an evening with my husband and child. (Since I’m not nearly the daredevil I used to be.)
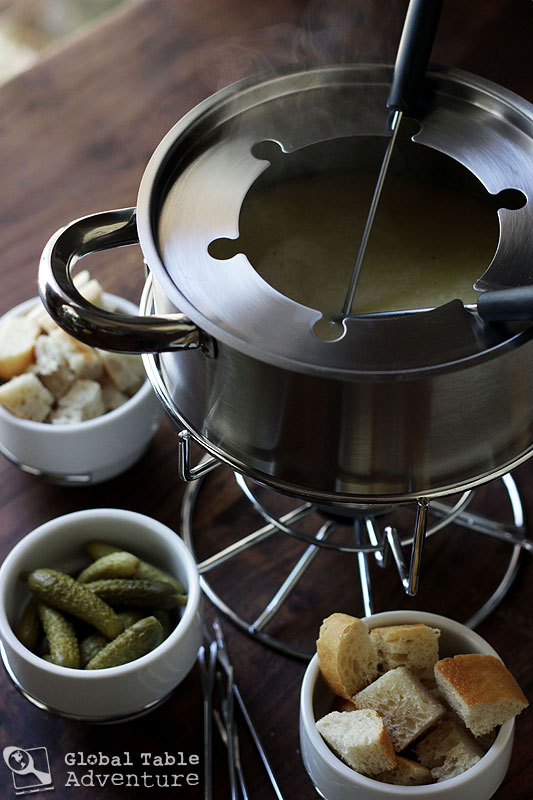
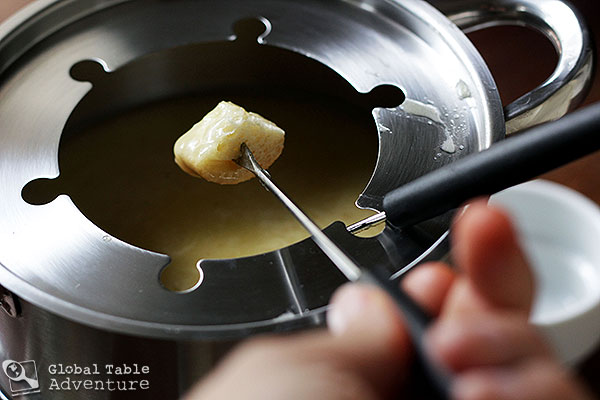
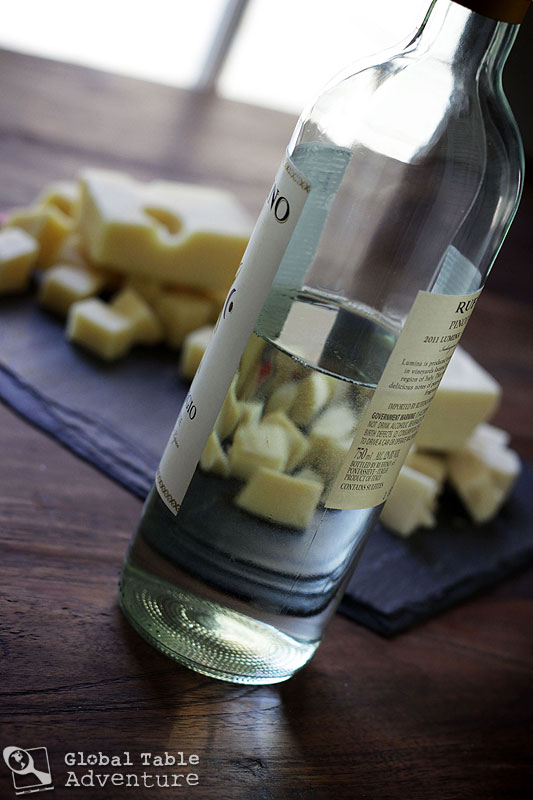
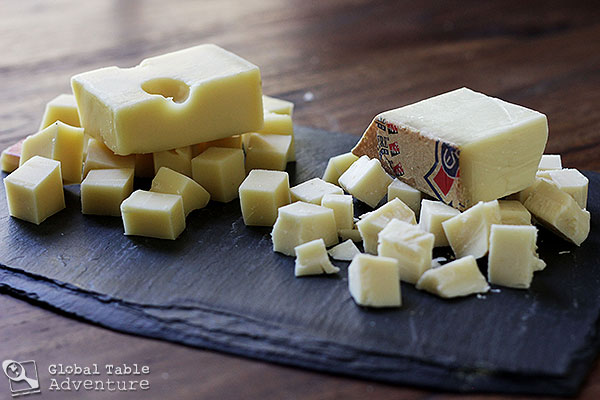
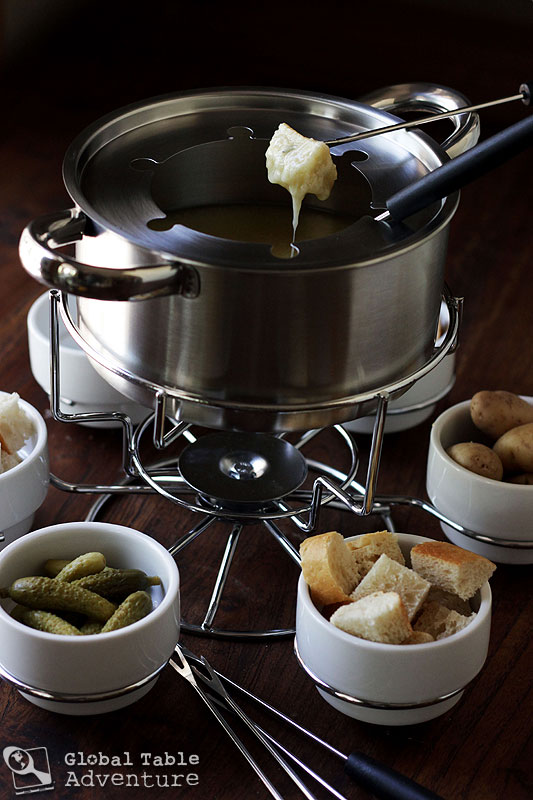
There are many ways to make fondue, but today I’m showing you a basic Neuchâteloise recipe that takes just a few minutes to pull together. The only requirements are a good quality dry white wine, plus a 50/50 blend of Emmental and Gruyere cheese. Feel free to serve it up with bread, gherkins, steamed veggies, pickled carrots, pickled cauliflower, boiled fingerling potatoes … you name it.
There are just a few points of etiquette.
[dropshadowbox align=”center” effect=”lifted-both” width=”575px” height=”” background_color=”#ffffff” border_width=”1″ border_color=”#dddddd” ]No Double Dipping The food should be cut small enough so that no one has to double dip. Because, let’s be honest, double dipping is gross when in polite company (if it’s just you and your husband? Go for it!).
No Eating off your Fork Unless you’re with close family, don’t eat off your long fork. It’s the same as double dipping. The fork should only be used to transfer the cheesy food to your plate. From there, you can pick it up with a regular fork.
Kissing & Drinks If you drop your food into the “caquelon,” you’ll have to kiss your neighbors, or buy everyone a drink.[/dropshadowbox]
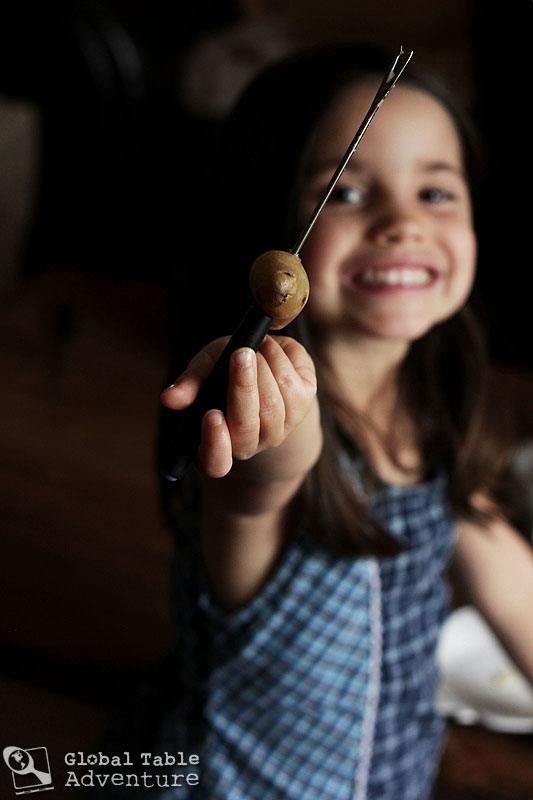
Regarding that last rule… you could always play it safe, like Ava did…
Serves 4-6
Ingredients:
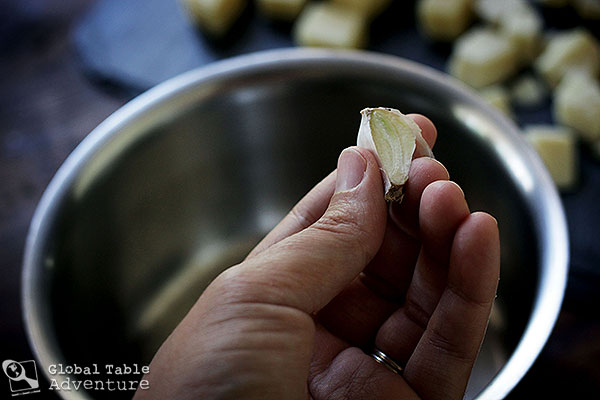
1 clove of garlic, sliced lengthwise (no need to peel)
2 cups dry white wine (preferably Neuchâtel)
1/2 lb Gruyere cheese, cubed or shredded
1/2 lb Emmentaler cheese, cubed or shredded
1 1/2 Tbsp cornstarch
pinch nutmeg
salt & pepper
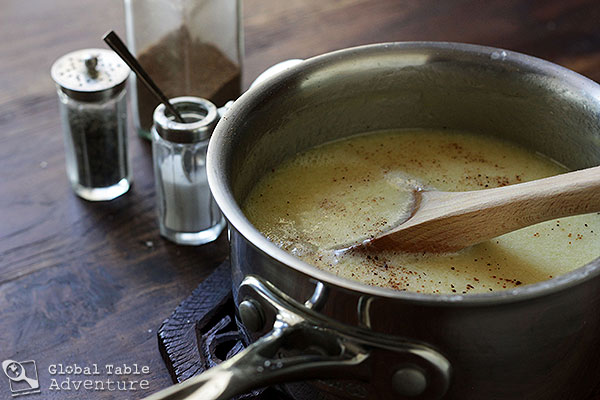
For starters, rub a small, heavy bottomed pot with the cut end of raw garlic. This will help infuse the faint aroma of garlic into the fondue, making the whole pot sing.
Next, pour in the wine and heat it up until a few bubbles just begin to break the surface. Whisk a little wine into the cornstarch to make a smooth slurry and whisk it back into the pot.
[dropshadowbox align=”none” effect=”lifted-both” width=”250px” height=”” background_color=”#ffffff” border_width=”1″ border_color=”#dddddd” ]Tip: Serve the rest of the wine with dinner![/dropshadowbox]
At this point, add the cheese.
As with most things in life, the key is to use great cheese, so don’t skimp here. I used a traditional Swiss blend of Gruyere which is nutty and somewhat sharp, and Emmentalier, which leans more towards the milder side of things.
Cube it up. The smaller the cubes, the quicker it melts. You can also shred it, if you have the patience; this does help it melt into the wine fastest of all.
Keep the heat low, and continue stirring until all the cheese melts in and the mixture thickens. For cubes, this can take ten minutes.
Then stir in the nutmeg, salt, and pepper, to taste.
Keep the cheese warm, over low heat, or add it to the “caquelon” part of a fondue set (the pot).
Enjoy on a rainy day.
With smiles on your mouth and heart.
Delicious!
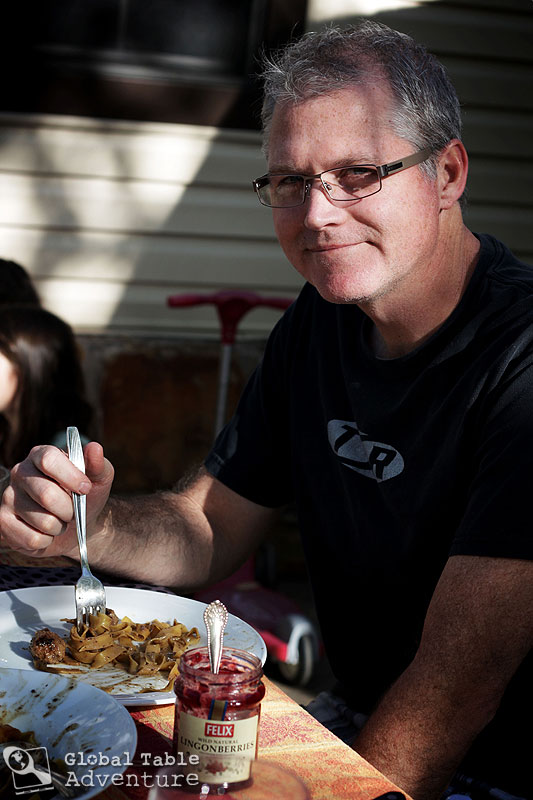
(The fondue AND Keith’s new glasses!)
[dropshadowbox align=”none” effect=”lifted-both” width=”575px” height=”” background_color=”#ffffff” border_width=”1″ border_color=”#dddddd” ]P.S. Because I love you… This week, I’m doing a special Facebook Giveaway. Check our Facebook Fan Page this Friday morning for a chance to win the same fondue set I used here. A winner will be announced on Facebook on Monday. For every Tweet you tag #myGTA, you’ll get an extra entry.
Good luck![/dropshadowbox]
Swiss Fondue
Votes: 2
Rating: 3
You:
Rate this recipe!
Print Recipe
There are many ways to make fondue, but today I'm showing you a basic Neuchâteloise recipe that takes just a few minutes to pull together. The only requirements are a good quality dry white wine, plus a 50/50 blend of Emmentalier and Gruyere cheese. Feel free to serve it up with bread, gherkins, steamed veggies, pickled carrots, pickled cauliflower, boiled fingerling potatoes ... you name it.
There are many ways to make fondue, but today I'm showing you a basic Neuchâteloise recipe that takes just a few minutes to pull together. The only requirements are a good quality dry white wine, plus a 50/50 blend of Emmentalier and Gruyere cheese. Feel free to serve it up with bread, gherkins, steamed veggies, pickled carrots, pickled cauliflower, boiled fingerling potatoes ... you name it.
No, I don’t hide a head of cauliflower in her mashed potatoes. I never slip zucchini in her pancakes when she’s not looking. And I refuse to bury carrots in her cake.
I don’t cater to my daughter that way.
Don’t get me wrong. On any old Monday, Ava can blow through a bowl of cauliflower mashed potatoes. On the weekend, she can annihilate a tower of zucchini pancakes before the early bird has had his breakfast.
And, as of today, she loves carrot in cake as well as any Swiss child.
Photo by Berner Sonntagstracht.
But she knows the vegetables are there. We talk about it. Laugh about it.
In our house, we revel in a real carrot’s gnarly glory. I point out the knots, the hairs, the fuzzy green top to Ava. She giggles, she scrunches up her nose, and then she chows down.
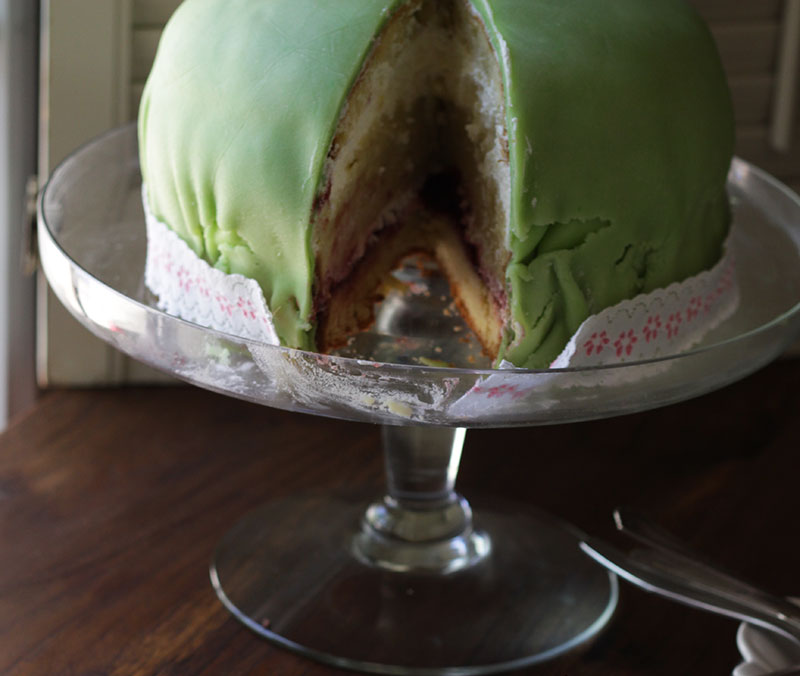
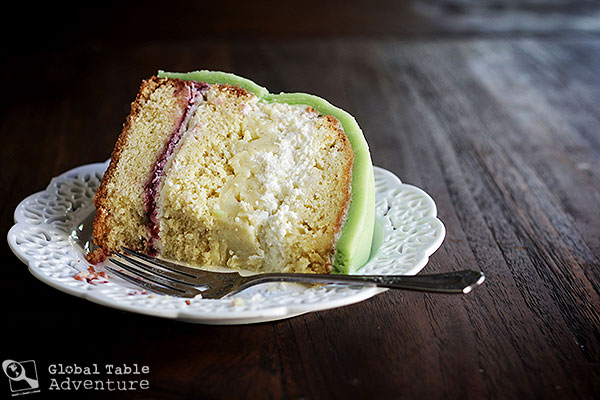
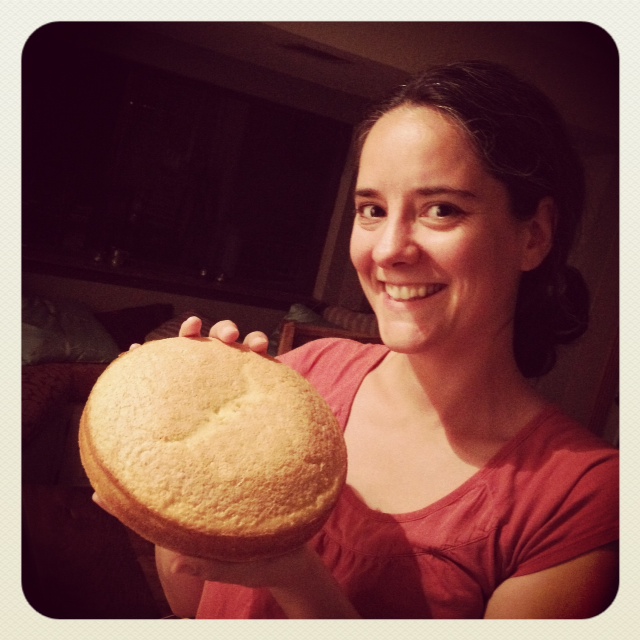
When I happened upon this traditional Swiss Carrot Cake, I realized that, though Ava had enjoyed many a gnarly carrot, she had never eaten carrot cake before.
Unlike the cake’s denser American cousin, the Swiss version of carrot cake is light, fluffy, and loaded with freshly ground almonds. It is found most commonly in the Aargau region of Switzerland (rumor has it, Aargau is the home to first carrot cake, although this would be extremely difficult to prove).
The batter is bound together with whipped egg white and breadcrumbs.
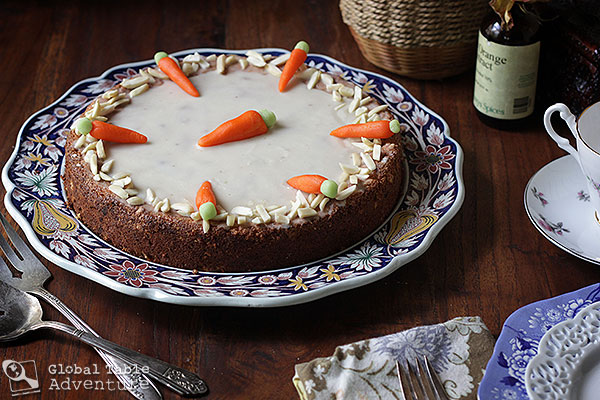
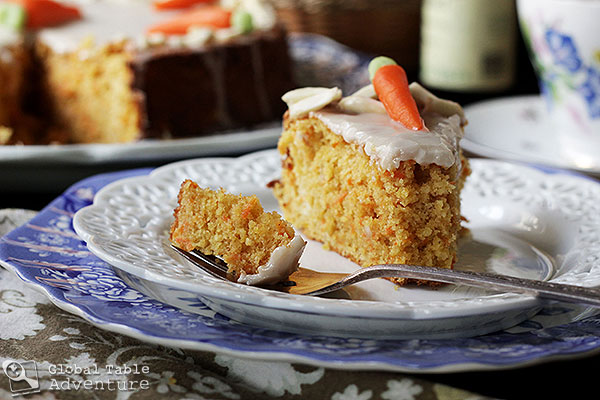
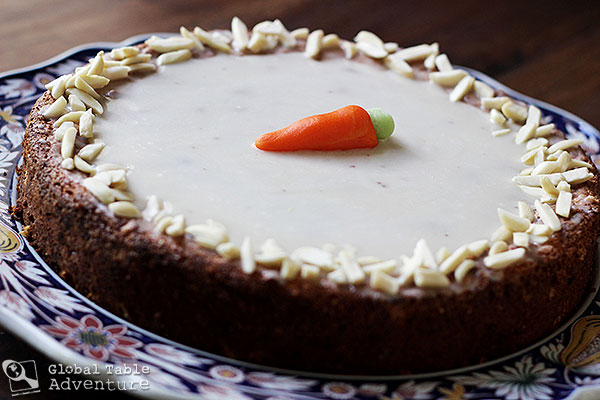
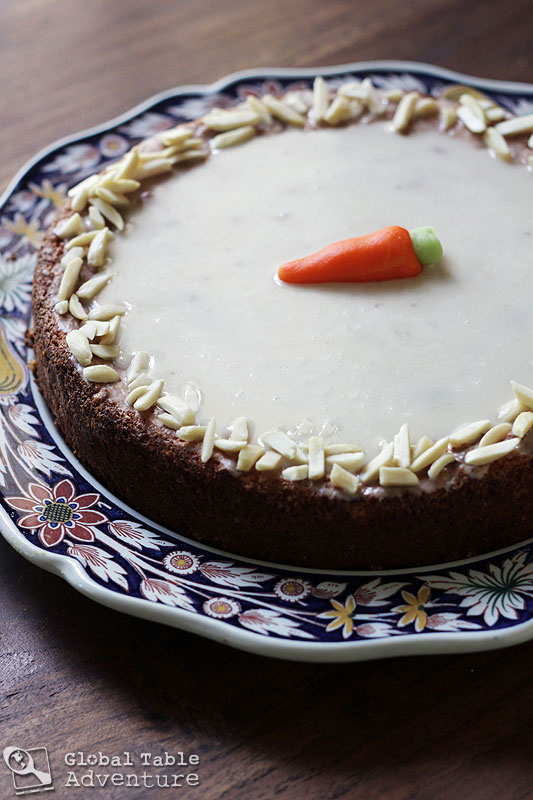
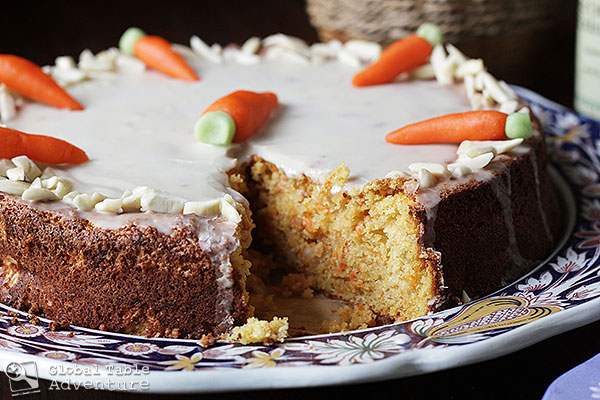
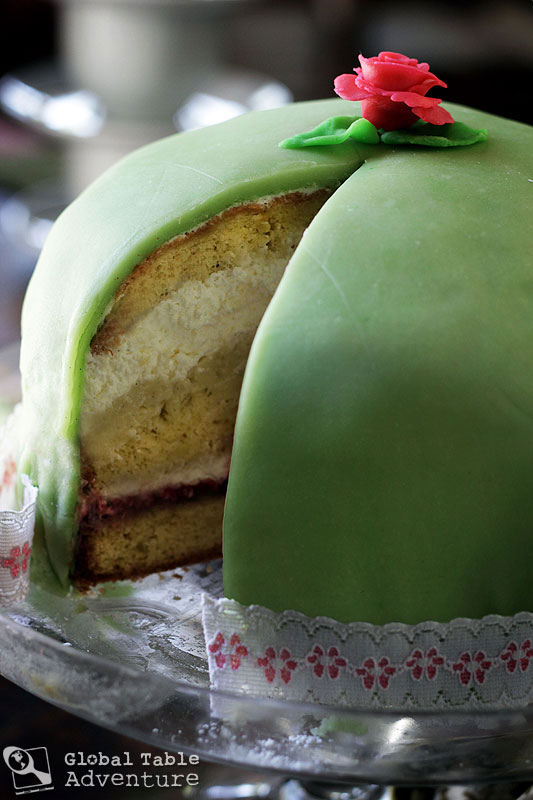
Finally, the top is coated with a lemon glaze, then decorated with marzipan carrots – a nod to the almonds inside.
(Psst… these carrots were rolled with the help of my three year old daughter. If we can do it, anyone can!)
This a fun, not overly sweet cake. I think it’d be especially great for a baby shower, first birthday, or tea party.
Oh, or, ahem, for Mother’s Day.
Makes one, 9 1/2 inch cake.
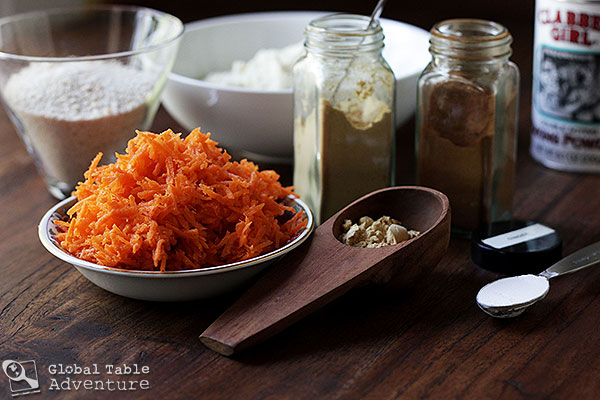
Ingredients:
For the cake:
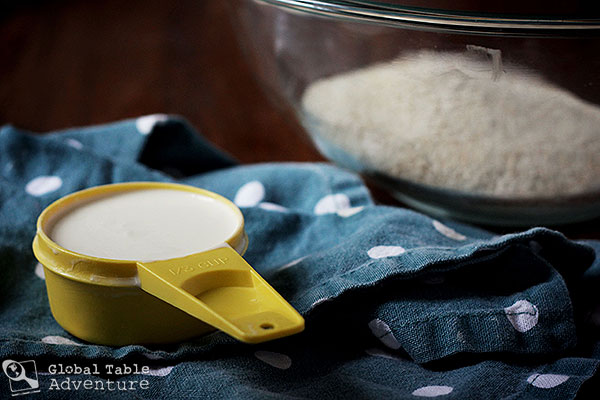
150 grams (2/3 cup, packed) raw, grated carrot
150 grams finely ground almonds (1 1/3 cups ground almonds, OR 1 1/4 cup slivered almonds, measured then finely ground)
3/4 cup fine breadcrumbs, plus more for dusting pan
1/2 teaspoon ground cinnamon
1 teaspoon ground ginger
1 teaspoon baking powder
pinch salt
6 large eggs, separated
1 1/4 cups granulated sugar
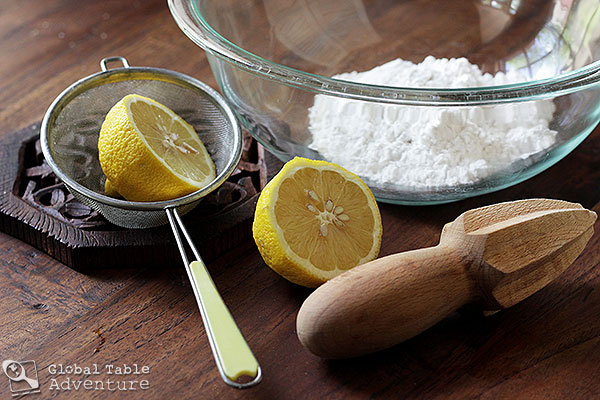
1 lemon, zested and juiced (or 2 Tbsp Kirsch)
For the Glaze:
1 1/2 cups sifted powdered sugar
3 tbsp lemon juice
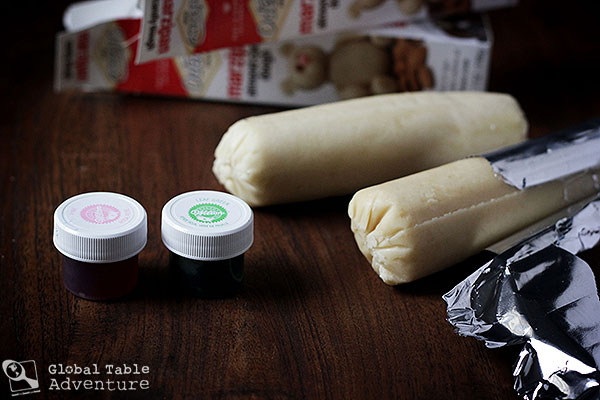
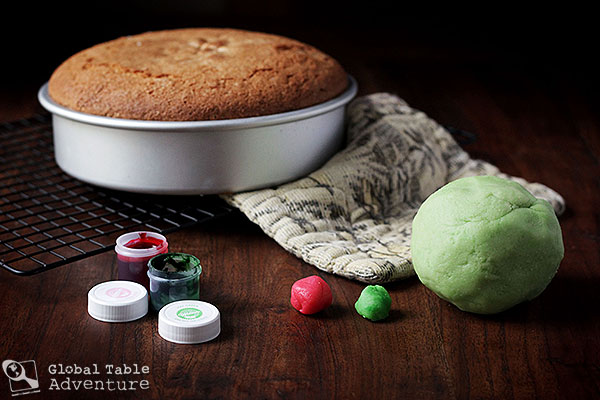
Decoration:
Marzipan colored with orange and green, then shaped into carrots
slivered or crushed almonds, as desired
Method:
For inspiration, place your kitchen in the Aargau region of Switzerland.
A hillside with a carroty glow will do quite nicely:
Wasserflue (Aargau). Photo by Benediktleander.
Next, preheat the oven to 350F. Grease and flour a 9 1/2″ springform pan. Add a circle of parchment paper to the bottom of the pan.
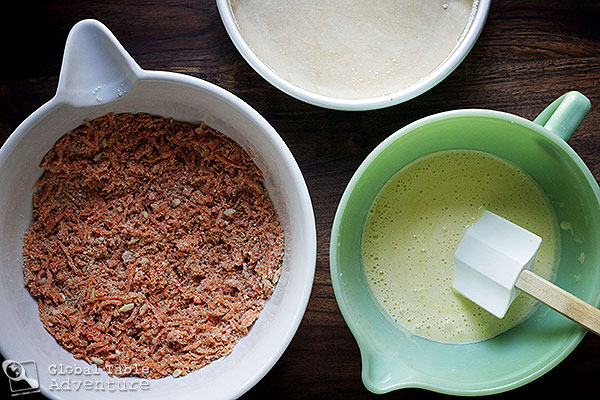
Mix the grated carrot, ground almonds, breadcrumbs, cinnamon, ginger, and baking powder in a large bowl.
TIP: The carrot should be grated over the medium holes of the box grater. You can grind the almonds in a spice grinder/coffee grinder, or a food processor.
Beat egg yolks until foamy, then stream in sugar, lemon rind, and juice. Continue beating on high until the mixture is pale and thick. Combine with the carrot mixture.
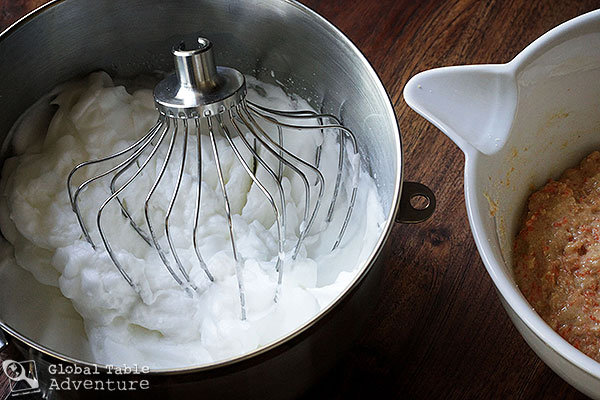
In a clean, dry bowl, beat the egg whites until stiff.
Fold together with the carrot mixture until just incorporated. I like to stir 1/3 of the whites in with the carrot mixture to lighten it, then I do the rest more gently.
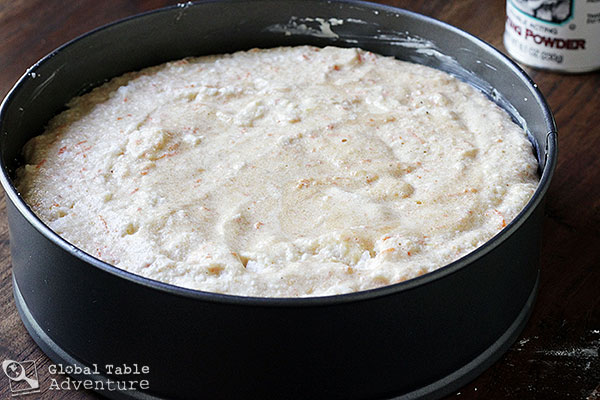
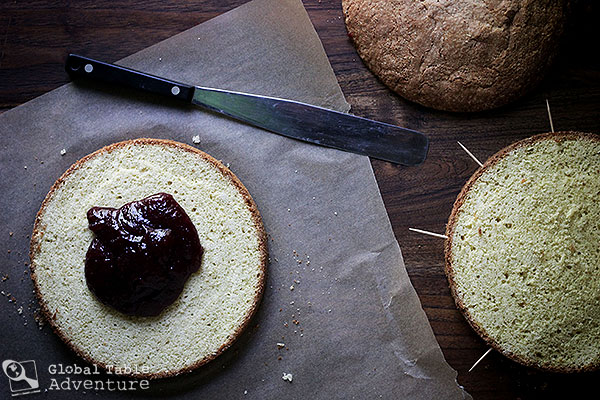
Pour into prepared pan, then pop into the oven and bake about 35 minutes or until a toothpick comes out clean. Let cool completely. Run a butter knife around the edges to help release it from the springform.
Meanwhile, prepare the glaze. Whisk the powdered sugar with fresh, strained lemon juice. (If you’d like it less tart, substitute some water for the lemon juice.)
Pour the glaze over the top of the cake, then decorate with almonds.
While the glaze sets, prepare the carrots. I used Wilton Gel Colors, Orange and Leaf Green. They don’t dilute the marzipan; you can find them at Michael’s and Hobby Lobby.
Make as many as you’d like! Just roll them in your hands until tapered, then top with a nob of green marzipan.
Let the cake float you (and your dreams) up and away. Enjoy the daydream. Enjoy the adventure.
Bridge over the Aar by Robert Maillart, built 1912; Aargau, Switzerland. In the background the reformed church and the fortress. Photo by Хрюша.
Almond Carrot Cake | Aargauer Rüeblitorte
Votes: 1
Rating: 5
You:
Rate this recipe!
Print Recipe
Unlike the cake’s denser American cousin, the Swiss version of carrot cake is light, fluffy, and loaded with freshly ground almonds. It is found most commonly in the Aargau region of Switzerland (rumor has it, Aargau is the home to first carrot cake, although this would be extremely difficult to prove).
Unlike the cake’s denser American cousin, the Swiss version of carrot cake is light, fluffy, and loaded with freshly ground almonds. It is found most commonly in the Aargau region of Switzerland (rumor has it, Aargau is the home to first carrot cake, although this would be extremely difficult to prove).
Preheat the oven to 350F. Grease and flour a 9 1/2″ springform pan. Add a circle of parchment paper to the bottom of the pan.
Mix the grated carrot, ground almonds, breadcrumbs, cinnamon, ginger, and baking powder in a large bowl.
TIP: The carrot should be grated over the medium holes of the box grater. You can grind the almonds in a spice grinder/coffee grinder, or a food processor.
In another bowl, beat egg yolks until foamy, then stream in sugar, lemon rind, and juice. Continue beating on high until the mixture is pale and thick. Combine with the carrot mixture.
In a clean, dry bowl, beat the egg whites until stiff. Fold together with the carrot mixture until just incorporated. I like to stir 1/3 of the whites in with the carrot mixture to lighten it, then I do the rest more gently.
Pour into prepared pan, then pop into the oven and bake about 35 minutes or until a toothpick comes out clean. Let cool completely. Run a butter knife around the edges to help release it from the springform.
Meanwhile, prepare the glaze. Whisk the powdered sugar with fresh, strained lemon juice in a small bowl. (If you’d like it less tart, substitute some water for the lemon juice.)
Pour the glaze over the top of the cake, then decorate with almonds and marzipan carrots.
“Who doesn’t honor the Rappen isn’t worth the Franken”
Swiss Proverb
I’m not one to pass up a penny on the ground. If I were in Switzerland, I suppose I’d pick up a Rappen with the same thrifty care as any penny on our soil (Rappen are like Swiss Pennies).
Apparently, I’m not alone. Enough Swiss people feel the same way, that they came up with the proverb at the top of this post: “Who doesn’t honor the Rappen isn’t worth the Franken” (100 Rappen make up a Franken).
But this proverb isn’t really about money. This is about the seemingly unimportant details of our lives that we overlook in the hustle and bustle of day to day living.
But these little details ARE important.
So much so, that the Swiss tell us, if we don’t take the time to care for the small things in life, we aren’t worth the big.
So what ‘Rappen’ have you been ignoring lately? Is it time to pick it up and give it some attention?
And while we’re at it, can a bite of Fondue help? How about Swiss Carrot Cake?
All recipes and the meal review will be posted throughout the week.
Have a hunk of bread that needs some lovin’? What about boiled fingerling potatoes? Dip them in our fondue, an ooey gooey blend of Gruyere and Emmentalier, melted with a happy slosh of white wine and a punch of garlic.
This is not your grandma’s carrot cake. Unless you happen to be from Switzerland. Aargauer Rüeblitorte is everything fluffy, light and airy, with the haunting addition of ground almonds and lemon glaze. P.S. This cake knows that everything is better with marzipan carrots. In case you were wondering.
Finsteraarhorn peak (4275m) in the Swiss Alps. Photo by Tom Bärfuss.
The thing I remember most about Switzerland was skiing in the Alps. I remember, because I came ridiculously close to dying. I was a novice, skiing on a slope at least one level beyond my own . It was late afternoon and the snow that had melted slightly in the warm noonday sun had now begun to refreeze and harden.
Suddenly, my skis caught in the ice and I could no longer get them to behave. Instead of turning with the rest of the skiers, I continued straight, towards a beautiful overlook. Beyond was the blue sky and a several hundred foot drop.
The rounded edge of the overlook, which was only protected by a billowing piece of orange plastic netting, sped closer and closer. My skies continued to reject my inputs. I had a choice to face: throw myself down or go down.
All the way down.
Wellenhorn, Bernese Alps. Photo by Clare66.
So I threw myself backwards. The force of my descent caused my giant red and pink ski coat to fly up. The ice scraped along my back, leaving cuts and scratches that would take two weeks to completely heal.
My body, still propelled by the downhill thrust of my skies just moments earlier, continued to slide, right up to the edge of the barrier.
Just as the snow bent towards the cliff, I stopped.
I didn’t get up right away, but lay there, staring at the darkening sky, listening to more experienced skiers continue their descent with light swishing sounds.
The Swiss Alps, my friends, are no joke.
Perhaps that’s why the Swiss love cheese so much. What other food can withstand the drama of the alps, what else can comfort a person after a near death experience?
There’s Fondue, a blend of good cheeses melted with wine… and hunks of bread dipped in it [Recipe]. Yes, please.
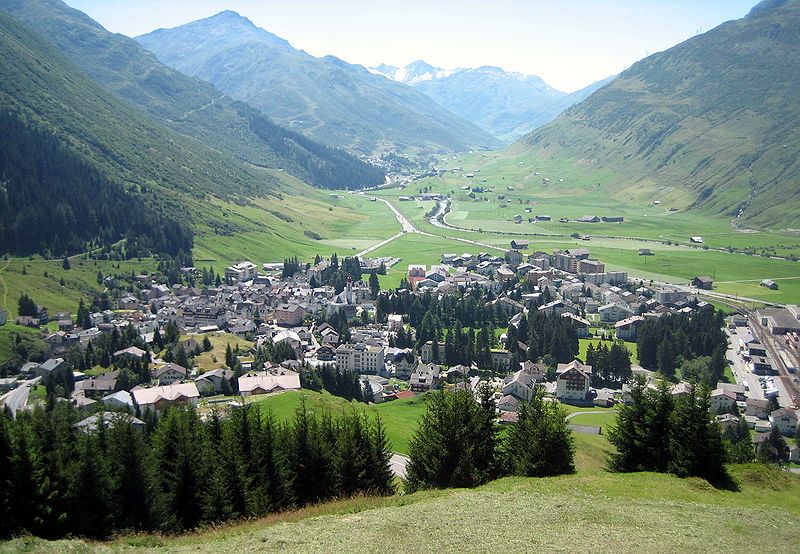
Andermatt. Photo by Adrian Michael.
There’s Raclette, which is my personal favorite – a combination of stinky cheese (the kind that might make a child run from a room giggling) melted and slid over hunks of potato.
And then there’s their version of Macaroni and Cheese (Älplermagronen), which also includes hunks of potato and onion.
Yum. Obviously.
(Speaking of potato, there’s also Rosti, a potato hashbrown kind of pancake. Hello.)
Think you’re off the hook in the summer? Think again. Try their apple and cheese salad, which is tossed in a mayo based dressing rather like coleslaw.
Uh-oh.
But, seriously, that’s not all the Swiss eat. They are known for their chocolate, but did you know they also make darn fine carrot cakes [Recipe]?
More on this soon.
P.S. I’m curious: what Swiss food do you like?
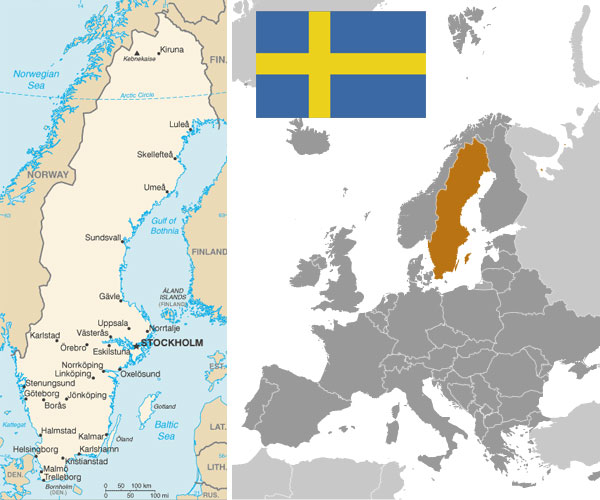
Maps and flag of Switzerland, plus photo of the Mudac Museum for Contemporary Applied Arts in Lausanne. All courtesy of the CIA World Factbook.
“Det är skönare lyss till den sträng som brast än att aldrig spänna en båge.”
“It is fairer to listen to the string that broke than to never strain a bow.” Verner von Heidenstam (Swedish Poet & Novelist)
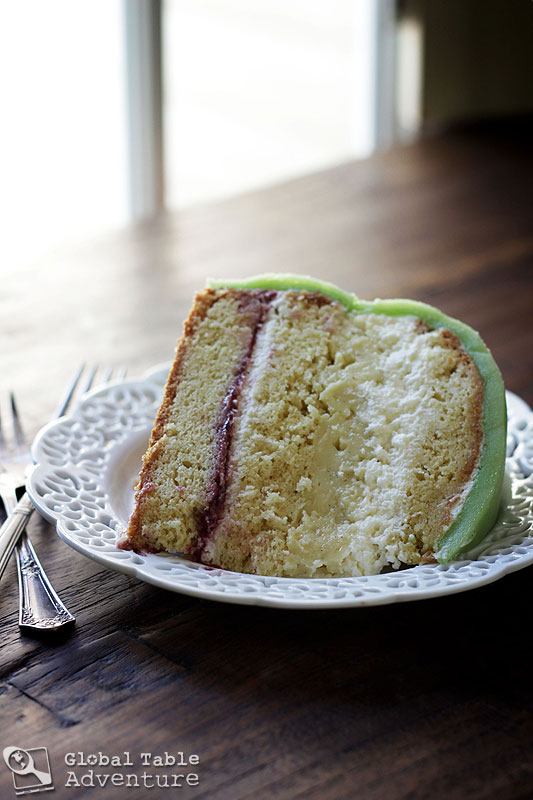
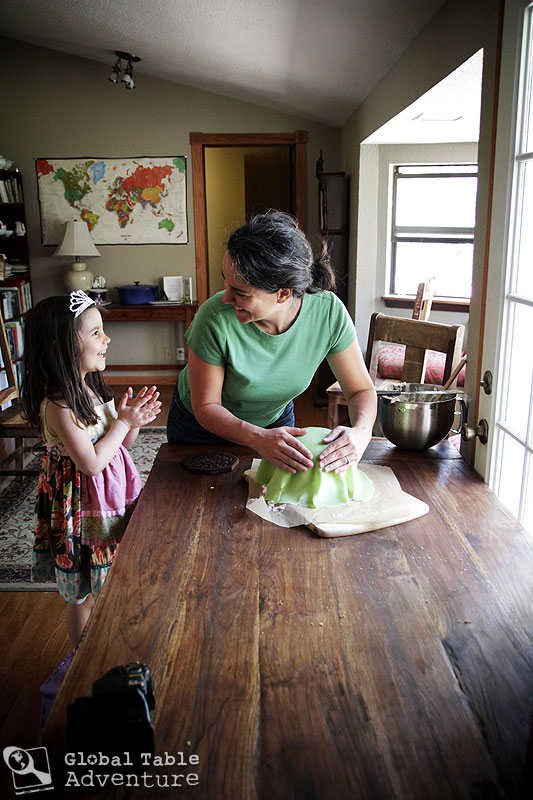
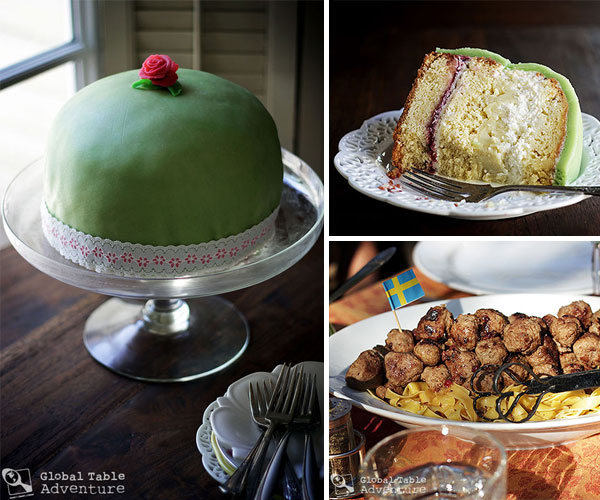
I slumped into my chair, put my head on my arms, and groaned. I’d spent hours making the Swedish princess cake, only to find out that the marzipan was too thin. Not only could I see the cake through the spring green coating, the marzipan began to crack as I struggled to stretch it over the cake. Whipped cream oozed thickly out of the seams and ripples.
Back to the store it was, to find more marzipan, color it, and cover the cake anew.
I also made the custard three times. And the cake batter three times.
I huffed. I puffed. I had a storm cloud over my head.
If this cake was a constant struggle, it was mostly because I wanted the recipe to work. I wanted it to be easy for you to follow in my footsteps, without the heartache of confusing instructions.
Many of you said my cake came out beautifully. Many of you said I did so well.
But I knew the truth. I knew what you weren’t seeing.
So, I thought I’d show you a little behind the scenes… behind the impression of “perfection,” so that you know that I’m only human. And most decidedly not the kind of human who knows what she’s doing when it comes to rolled marzipan (or fondant for that matter).
First: The photo from the blog. So pretty! A little rippling, but nothing out of Frankenstein. She’s pretty much “together.”
Now, for what the other side looked like:
Cue the scary music.
Not exactly runway ready.
Look at those cracks. Those puckers. Those wrinkles. The only reason you don’t see whipped cream oozing out from that mess is that I had a double layer of marzipan.
The lesson? Always have the ability to present your cake up against a wall… just in case.
(Though I will say, both sides of the cake tasted just as good.)
I’m curious:Anyone else want to “keep it real”? Do you have one (or more!) baking or decorating disasters in your history? What happened? How did you deal with it? Were you able to fix it? Like the old Swedish proverb at the top of this post, were you glad you tried? In the end, were you glad you “strained the bow?” or are you done trying?
Everything. The flavor of Swedish meatballs is fantastic; they go so well with the cream sauce and tart lingonberry jam. I’d vote for this as the ultimate party food (serve them on a platter with toothpicks, like they do in Sweden at Christmastime). I’m happy to report that the entire family was all about them (hello, egg noodle bliss!). I honestly can’t believe it took me this long to try my hand at making them; they really are the best! It was an added bonus that my Swedish friend Alex asked for the recipe. Awesome.
What I loved least about this recipe:
Nothing. The recipe is super easy… Just know that it takes a while to shape all the meatballs…. so invite a friend to help, or set up shop in front of your favorite show. And be sure to use a bowl of water to moisten your hands. It really does keep the meatballs from sticking.
Once it finally came together, this cake was stunning … just so lovely.. and the flavor was fresh and springy. It really felt like a special occasion cake… and I’m so glad I tried it. I want to try it again sometime, when I don’t have the pressure of taking photos. I think it will go a lot easier.
What I loved least about this dessert:
I almost called this post “Monday Meal Review: Princess Cake” … because so much of this week’s Adventure was struggling to make that cake properly.This is definitely an advanced recipe. Not so much because of the cake (that recipe is super easy), the custard, or the whipped cream… but because of the marzipan. Use the video I shared (see recipe post) to help you see how it gets smoothed on (or, even better, invite a friend over who knows how to work with fondant… it’s the same thing). That being said, I still encourage you to try it out… even Swedes will hide their mistakes behind a dusting of powdered sugar or a clump of marzipan flowers.
But just look at this… how could you not try it once?
I never thought I’d say it but here goes: “I’ve spent the large majority of my adulthood pining over meatballs.”
Not just any meatballs, but Swedish meatballs.
We used to eat them for lunch at my small high school in Luxembourg. On those days, I made sure to bring enough money to buy two portions. The bellyache was worth it.
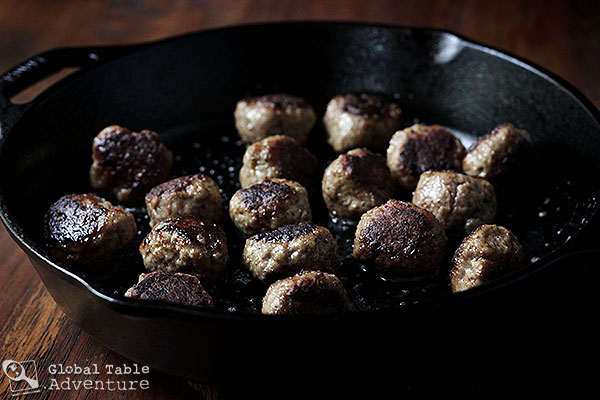
When made perfectly, Swedish Meatballs are tender, but do not fall apart, thanks to the perfect balance of breadcrumbs and cream. After a brisk sizzle and shake in butter, they brown up and fill the kitchen with the delicious scent of fried onions (thanks to the grated onion that’s been worked into the mix).
Sneak a meatball from the pan, and you’ll discover the glory, complex flavor, thanks in great part to a blend of good quality meats (usually beef, pork, and veal, although many just use beef and pork).
Somewhere in the background, there’s a ghost of something else. You might never figure it out, unless you were the one who made them: nutmeg.
Just enough to tease.
(Look, Mr. Picky got glasses!!)
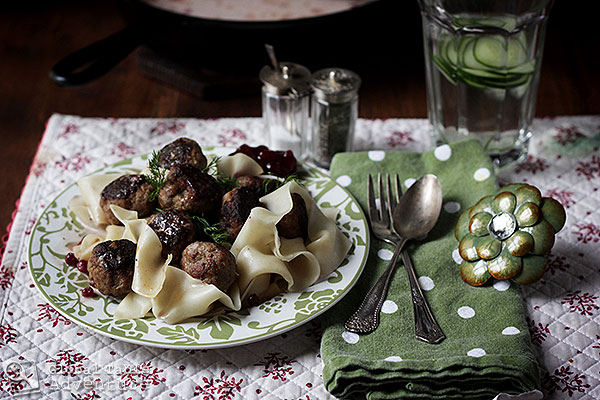
But don’t eat them all while standing, barefoot, in front of the still-sizzling pan. Set them aside a moment, if you can stand it, and throw together a quick sauce with cream, chicken stock, and a spoonful of lingonberry jam.
Pour the sauce over the meatballs and a heaping of egg noodles. Or perhaps some mashed potatoes. Either way is as Swedish as it gets.
Makes at least 60 1″ meatballs. Recipe inspired by several sources, including Marcus Samuelsson.
[dropshadowbox align=”center” effect=”lifted-both” width=”550px” height=”” background_color=”#ffffff” border_width=”1″ border_color=”#dddddd” ]Tip: Most adults can eat at least 10 of these, so this recipe serves about 6. If you don’t need so many meatballs, cover and refrigerate half the mixture to make a night or two later. You’ll be glad you did![/dropshadowbox]
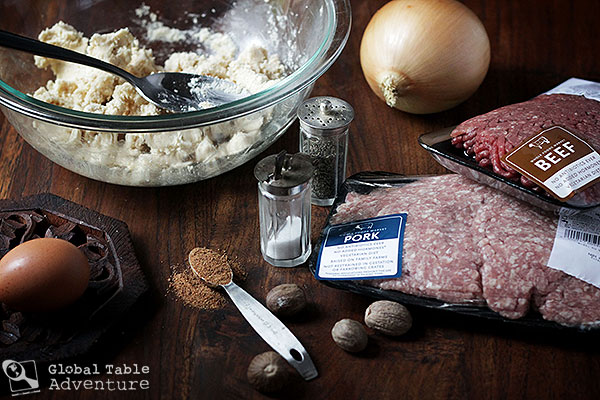
Ingredients:
For the meatballs:
1 lb ground beef
1 lb ground pork
3/4 cup breadcrumbs
2/3 cup heavy cream
1 egg
1 onion, grated
1/2 tsp grated nutmeg
salt & pepper (Be generous. I used 1 1/2 tsp salt and 1 tsp pepper)
For the sauce:
1 cup chicken stock
1/2 cup heavy cream
1/4 cup lingonberry jam
salt & pepper
Accompaniments:
Lingonberry Jam
Dill (optional, for color)
Method:
Let’s go to Sweden! There’s no quicker way than with Swedish Meatballs.
Stockholm. Photo by McKay Savage.
FOR THE MEATBALLS:
Add all meatball ingredients to a bowl. Mix thoroughly with hands until smooth. Be sure to include ALL those juices from the grated onion, as they add both great flavor and important moisture.
Note: Do NOT mix the cream with the breadcrumbs ahead of time, as many recipes suggest. The mixture is too dry and will leave clumps in your meatballs.
(You can use a food processor, if you’d like the meat ultra fine and smooth).
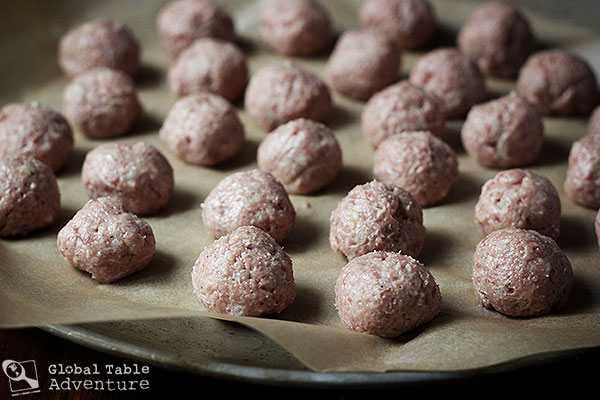
Form into small meatballs, about 1″ in diameter. I found using a measuring spoon to scoop out the mixture before shaping kept the sizes pretty equal. A scant tablespoon should be about right.
Keep a bowl of water at your side. If the mixture begins to stick to your hands, rub a little water on your palm.
You can refrigerate the meatballs as you work. It goes quickly if you have a friend helping you.
Fry in butter, in batches. Make them as brown and crispy as you’d like… that’s the best part! I cooked all mine in about four batches. You can keep them warm in a 200F oven, if needed.
FOR THE SAUCE:
If there’s an excess of grease in your pan, pour it off. I didn’t bother with this, as I love the taste of butter and browned bits… and there really wasn’t much fat in the pan.
Add the stock, cream, and lingonberries. Stir and simmer about 5 minutes. At the end of five minutes, the mixture will still be pretty thin, but it will thicken to more of a gravy once it cools a bit.
Pour over the meatballs and egg noodles.
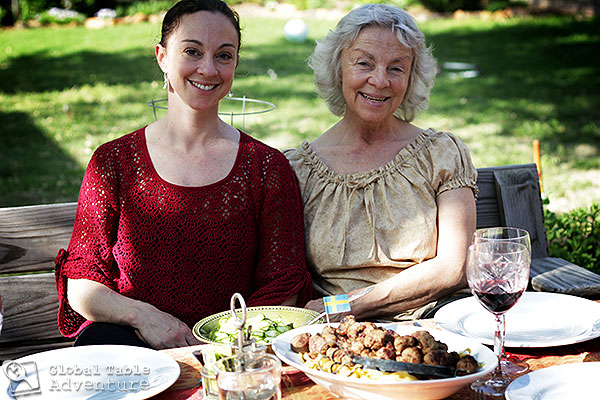
Our Swedish friend, Alex, and her mother loved this recipe!
In fact, Alex asked for the recipe, which is the ultimate honor, coming from a Swede.
Phew.
Enjoy on a sunny afternoon with friends.
P.S. I’m curious. Have you ever had Swedish meatballs?
Have you ever made them yourself?
Any tips and tricks?
Swedish Meatballs
Votes: 0
Rating: 0
You:
Rate this recipe!
Print Recipe
When made perfectly, Swedish Meatballs are tender, but do not fall apart, thanks to the perfect balance of breadcrumbs and cream. After a brisk sizzle and shake in butter, they brown up and fill the kitchen with the delicious scent of fried onions (thanks to the grated onion that's been worked into the mix).
When made perfectly, Swedish Meatballs are tender, but do not fall apart, thanks to the perfect balance of breadcrumbs and cream. After a brisk sizzle and shake in butter, they brown up and fill the kitchen with the delicious scent of fried onions (thanks to the grated onion that's been worked into the mix).
Mix thoroughly with hands until smooth. Be sure to include ALL those juices from the grated onion, as they add both great flavor and important moisture.
(You can use a food processor, if you'd like the meat ultra fine and smooth).
Form into small meatballs, about 1" in diameter.
Keep a bowl of water at your side. If the mixture begins to stick to your hands, rub a little water on your palm.
You can refrigerate the meatballs as you work.
Fry in butter, in batches. Make them as brown and crispy as you'd like.
Once done with the meatballs add the stock, cream, and lingonberries to the pan. Stir and simmer about 5 minutes.
Pour over the meatballs and egg noodles.
Recipe Notes
Note: Do NOT mix the cream with the breadcrumbs ahead of time, as many recipes suggest. The mixture is too dry and will leave clumps in your meatballs.
I found using a measuring spoon to scoop out the mixture before shaping kept the sizes pretty equal. A scant tablespoon should be about right.
They say this spring green dome from the 1930’s made with layers of sponge cake, raspberry jam, custard, and whipped cream is DIFFICULT. Everyone says so, in fact, except for the Swedes.
Curious, right?
I finally figured out why: Swedish folk have great recipes and three quarters of a century’s worth of tips and tricks up their sleeves.
Like, ahem, pre-rolled marzipan and boxed custard. I even saw one Swedish video which used prepacked cake, already sliced in thirds.
“We all start out as children.”
This Swedish Proverb hints at what I learned, first hand, when making this cake: we must crawl before we can walk, we must be children before we are grown.
Experience comes one step at a time.
Considering I made each part of this cake 3 times, and messed it up terribly along the way… I thought you might benefit from my errors.
So, do forgive me, but before we get into the recipe, I must tell you about the top five mistakes I made when making this cake, so you don’t do the same.
TOP FIVE MISTAKES WHEN MAKING A SWEDISH PRINCESS CAKE
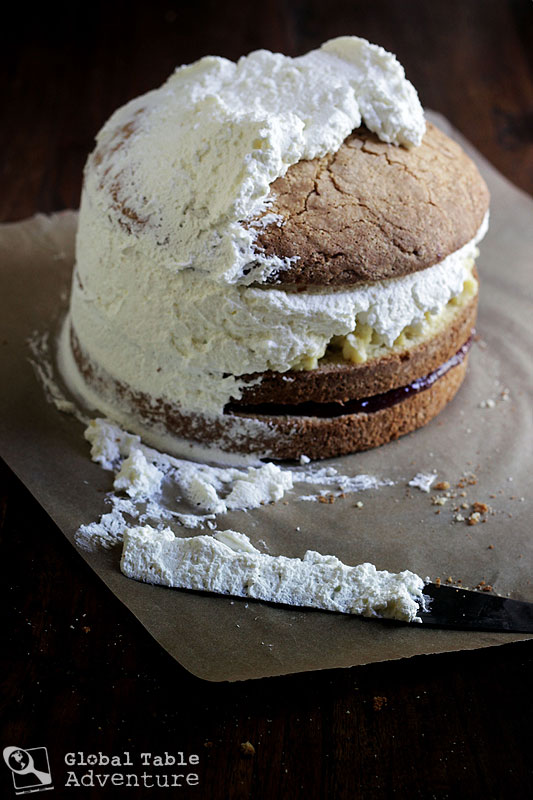
1. I based my cake on a bad recipe. I didn’t realize it, but two of the recipes I originally adapted from were missing a key ingredient: water. As a result, my cake kept coming out dry and overcooked on the edges (note the bottom of this photo).
Though most of the photos in this post show really dark edges and a dry, dense crumb, have no fear; I’ve since fixed my recipe, so yours will be light in color and fluffy in texture. I took a picture with my phone, so that you could see what it should look like:
2. Food Coloring. If you really want to make your marzipan sticky, use regular food coloring. If, however, you want to keep from having a huge mess, use gel colors, such as Wilton’s (available at craft and baking supply stores). They don’t dilute the marzipan and it stays relatively mess free. Plus, you can use them for buttercream and icing.
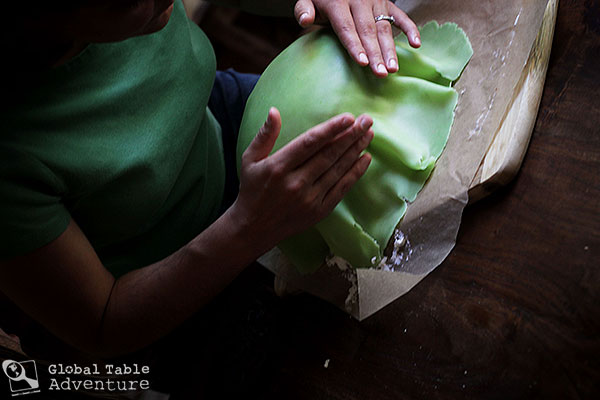
3. I tried to roll my marzipan at room temperature. It’s much better to roll the marzipan RIGHT after you mix the color in, not later on. The heat from your hands will have made it much more pliable. You can even stand on a step stool to get some more weight behind your rolling pin. (And be sure to do it between two sheets of parchment paper, so it doesn’t stick).
4. I rolled my marzipan too thin. If rolled too thinly, the cake shows through (see below) and it encourages cracking when you try to press it onto the cake. Don’t worry, my recipe has been updated so that you use an extra tube of marzipan, so you don’t make the same mistake I did. (I later went back and doubled up over the too-thin layer, which is always an option if you make the same mistake I did).
5. I thought I could do it right on the first try. No one, not even Doctor Who, could smooth marzipan over a cake of this height without cracks or ripples… especially not on the first try… (Unless you already know how to work with fondant, in which case I’m very jealous). Somewhere I saw a blogger suggest testing out your skills on an inverted bowl. This is a great idea… because, once you get whipped cream on your marzipan, you can’t re-roll it. And marzipan is too expensive to make that mistake with.
Remember, worse case scenario, you could always just drape the marzipan like a rippled curtain. And you can hide the wrinkly seams behind ribbon (as I did) or under some extra flowers – my friend says people put flowers and leaves (and even powdered sugar) all over their cakes in Sweden to hide mistakes.
Here’s a video I watched that was tremendously helpful when it came to assembly:
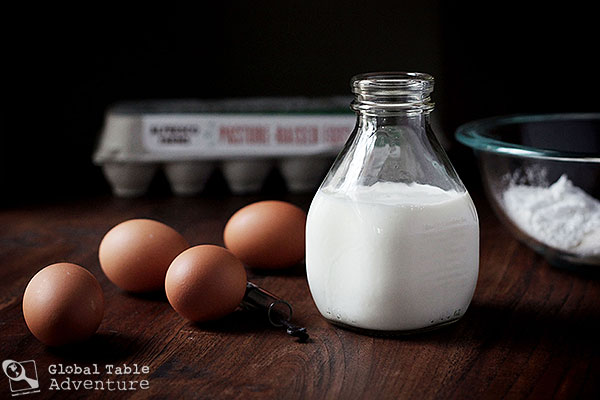
2 cups whole milk
1 vanilla bean, split and scraped
1/2 cup sugar
4 egg yolks
1/3 cup cornstarch
For the cake:
2 cups cake flour
2 tsp baking powder
4 eggs
1 cup sugar
3/4 cup warm water parchment paper and butter, for prepping pan
To assemble:
1/2 cup Raspberry jam (seedless)
3 cups heavy cream, whipped stiff (sweetened, as desired)
21 ounces marzipan (3 packages)
green food coloring
red food coloring
powdered sugar, for dusting
Method:
Turn on a little Swedish Music to get things going.
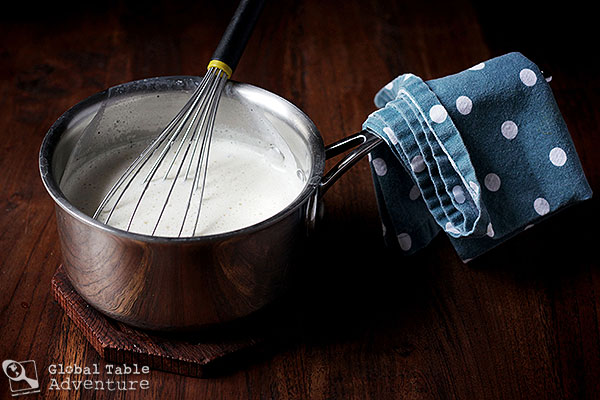
1. Prepare the pastry cream.
Heat up the milk with the vanilla bean scrapings and sugar. Meanwhile, whisk together the yolks (reserve the whites for another use) and cornstarch in a medium bowl. When the milk is hot, whisk a little at a time into the yolk mixture, taking care not to curdle them.
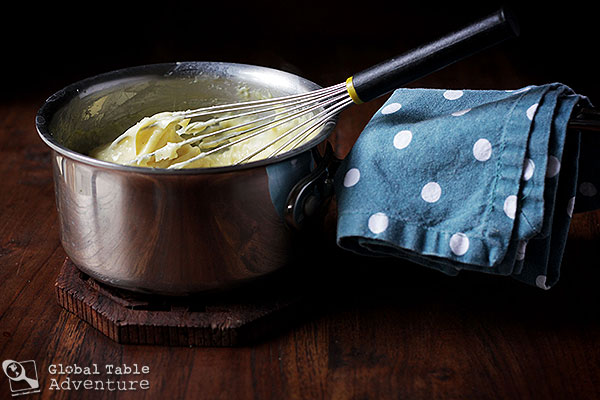
Strain the mixture back into the pot, return to the stove and cook until thickened, whisking often so that it doesn’ t clump up or stick.
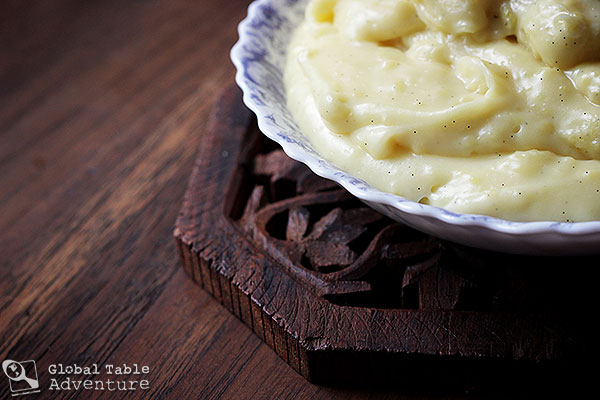
Look at those flecks of pure vanilla bean goodness!
Set aside the custard until cooled to room temperature (preferably poured onto an 8″ plate. This will make your job easier later, as it’s a bit thicker than the spreadable custard). Meanwhile…
2. Prepare the cake.
Preheat the oven to 350F. Grease and flour an 8″ cake pan. Insert a circle of parchment paper in the bottom.
Whisk together the flour and baking powder. In a standing mixer, whip the eggs with the sugar on high speed until fluffy and pale yellow. Sream in the water, then fold the flour mixture into the eggs.
Pour into prepared cake pan and bake about 40-45 minutes, or until an inserted toothpick comes out clean.
Let cool completely.
3. Prepare the marzipan
Mix some food coloring paste into three tubes (21 ounces) of marzipan. You want to make an ounce or two of the marzipan pink, for the flower(s).
Next, work on the green. The best way to do this is to mix the green into a handful of marzipan until smooth. Make it darker than you need (and save a pinch of this dark green for leaves). Then work this dark green into the remaining marzipan and work until smooth (I believe the proper technique is “break it apart, mash it, break it apart, mash it, and so on until the color is even).
Here’s the colors you end up with:
If the marzipan gets sticky, use powdered sugar to dust your hands.
4. Roll out the Marzipan
Once the marzipan is really warm from being worked with your hands, roll it out.
Place between two sheets of parchment paper and roll out in a circle, until 2 mm thick and about 16-17″ wide (although you might want to measure your cake after you assemble it, with a tape measure, just in case you need more or less). Remove the parchment paper at the very end and roll it smooth to get rid of any lines the parchment paper may have pressed into the marzipan.
Keep under tightly pressed parchment or saran until needed (so it doesn’t dry out).
4. Assemble the cake
Now for the fun!
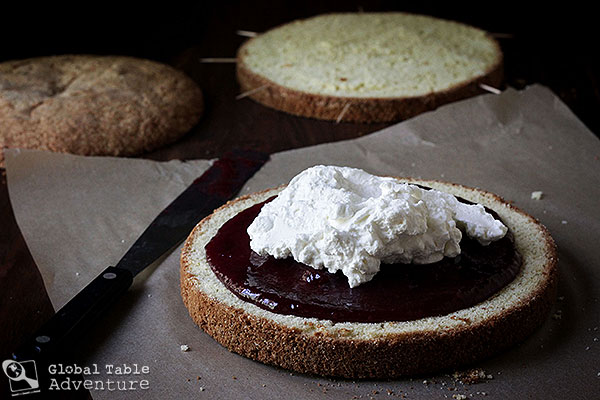
Cut the cake in three even pieces, as show below. Use toothpicks to guide your knife evenly (you can measure up from the bottom of the cake to help you put the toothpicks at the same height all around)
TIP: I doubt you’ll have browned edges, like I did. BUT, if you do, feel free to trim off the browned edges for a more refined look.
The first layer needs the raspberry jam and a scoop of whipped cream. Be sure to keep the jam away from the edge of the cake, as I have done. This will help keep it from oozing out once you press the layers together.
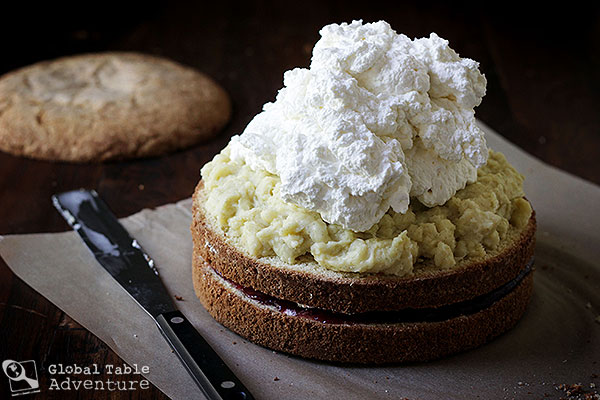
Then add the second layer, the vanilla custard, and then a mini mountain of whipped cream. Use your spatula to smooth it into an even mound.
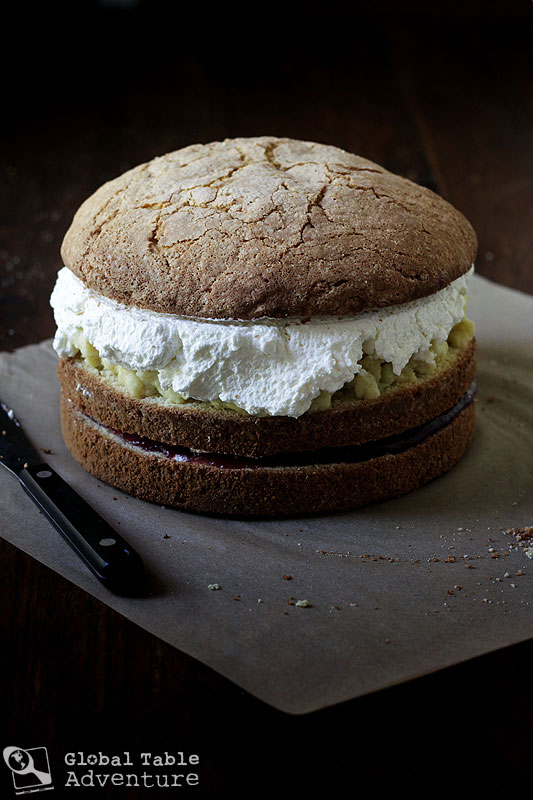
Add the final cake layer, pressing down with your hands on the edges, to encourage it to curve.
(Remember your cake won’t be this dried out)
Use the last bit of whipped cream to cover the entire cake.
Cover with marzipan… you might find it tricky to smooth out the marzipan. I did. So I tried again (leaving the original layer on top, so we ended up with a double coating of marzipan – yum!).
You can dust your hands with powdered sugar to keep the marzipan from sticking.
Decorate with green leaves and a pink flower.
Enjoy with the easy smile of a Swede.
So what do you think?
Would you ever attempt this beautiful Swedish Princess Cake?
(I made ALL the mistakes possible, so you wouldn’t have to, I promise!)
Swedish Princess Cake | Prinsesstårta
Votes: 0
Rating: 0
You:
Rate this recipe!
Print Recipe
They say this spring green dome from the 1930’s made with layers of sponge cake, raspberry jam, custard, and whipped cream is DIFFICULT. Everyone says so, in fact, except for the Swedes. Curious, right? I finally figured out why: Swedish folk have great recipes and three quarters of a century’s worth of tips and tricks up their sleeves. Like, ahem, pre-rolled marzipan and boxed custard. I even saw one Swedish video which used prepacked cake, already sliced in thirds.
They say this spring green dome from the 1930’s made with layers of sponge cake, raspberry jam, custard, and whipped cream is DIFFICULT. Everyone says so, in fact, except for the Swedes. Curious, right? I finally figured out why: Swedish folk have great recipes and three quarters of a century’s worth of tips and tricks up their sleeves. Like, ahem, pre-rolled marzipan and boxed custard. I even saw one Swedish video which used prepacked cake, already sliced in thirds.
3cupsheavy cream, whipped stiff (sweetened as desired)
21ozmarzipan(3 packages)
green food coloring
red food coloring
powdered sugar, for dusting
Servings: cake
Units:
Instructions
Prepare the pastry cream
Heat up the milk with the vanilla bean scrapings and sugar. Meanwhile, whisk together the yolks (reserve the whites for another use) and cornstarch in a medium bowl. When the milk is hot, whisk a little at a time into the yolk mixture, taking care not to curdle them.
Strain the mixture back into the pot, return to the stove and cook until thickened, whisking often so that it doesn't clump up or stick. Set aside the custard until cooled to room temperature (preferably poured onto an 8″ plate. This will make your job easier later, as it’s a bit thicker than the spreadable custard).
Prepare the cake
Preheat the oven to 350F. Grease and flour an 8″ cake pan. Insert a circle of parchment paper in the bottom.
Whisk together the flour and baking powder. In a standing mixer, whip the eggs with the sugar on high speed until fluffy and pale yellow.
Stream in the water, then fold the flour mixture into the eggs.
Pour into prepared cake pan and bake about 40-45 minutes, or until an inserted toothpick comes out clean.
Let cool completely.
Prepare the marzipan
Mix some food coloring paste into three tubes (21 ounces) of marzipan. You want to make an ounce or two of the marzipan pink, for the flower(s).
Next, work on the green. The best way to do this is to mix the green into a handful of marzipan until smooth. Make it darker than you need (and save a pinch of this dark green for leaves). Then work this dark green into the remaining marzipan and work until smooth (I believe the proper technique is “break it apart, mash it, break it apart, mash it, and so on until the color is even).
Roll out the marzipan
Once the marzipan is really warm from being worked with your hands, roll it out. Place between two sheets of parchment paper and roll out in a circle, until 2 mm thick and about 16-17″ wide (although you might want to measure your cake after you assemble it, with a tape measure, just in case you need more or less). Remove the parchment paper at the very end and roll it smooth to get rid of any lines the parchment paper may have pressed into the marzipan.
Keep under tightly pressed parchment or saran until needed (so it doesn’t dry out).
Assemble the cake
Cut the cake in three even pieces, as show below. Use toothpicks to guide your knife evenly (you can measure up from the bottom of the cake to help you put the toothpicks at the same height all around)
TIP: I doubt you’ll have browned edges, like I did. BUT, if you do, feel free to trim off the browned edges for a more refined look.
The first layer needs the raspberry jam and a scoop of whipped cream. Be sure to keep the jam away from the edge of the cake, as I have done. This will help keep it from oozing out once you press the layers together.
Then add the second layer, the vanilla custard, and then a mini mountain of whipped cream. Use your spatula to smooth it into an even mound.
Add the final cake layer, pressing down with your hands on the edges, to encourage it to curve. Use the last bit of whipped cream to cover the entire cake.
Cover with marzipan… you might find it tricky to smooth out the marzipan. I did. So I tried again (leaving the original layer on top, so we ended up with a double coating of marzipan – yum!).
You can dust your hands with powdered sugar to keep the marzipan from sticking.
Decorate with green leaves and a pink flower.
Recipe Notes
TOP FIVE MISTAKES WHEN MAKING A SWEDISH PRINCESS CAKE
1. I based my cake on a bad recipe. I didn’t realize it, but two of the recipes I originally adapted from were missing a key ingredient: water. As a result, my cake kept coming out dry and overcooked on the edges (note the bottom of this photo).
Though most of the photos in this post show really dark edges and a dry, dense crumb, have no fear; I’ve since fixed my recipe, so yours will be light in color and fluffy in texture. I took a picture with my phone, so that you could see what it should look like:
2. Food Coloring. If you really want to make your marzipan sticky, use regular food coloring. If, however, you want to keep from having a huge mess, use gel colors, such as Wilton’s (available at craft and baking supply stores). They don’t dilute the marzipan and it stays relatively mess free. Plus, you can use them for buttercream and icing.
3. I tried to roll my marzipan at room temperature. It’s much better to roll the marzipan RIGHT after you mix the color in, not later on. The heat from your hands will have made it much more pliable. You can even stand on a step stool to get some more weight behind your rolling pin. (And be sure to do it between two sheets of parchment paper, so it doesn’t stick).
4. I rolled my marzipan too thin. If rolled too thinly, the cake shows through (see below) and it encourages cracking when you try to press it onto the cake. Don’t worry, my recipe has been updated so that you use an extra tube of marzipan, so you don’t make the same mistake I did. (I later went back and doubled up over the too-thin layer, which is always an option if you make the same mistake I did).
5. I thought I could do it right on the first try. No one, not even Doctor Who, could smooth marzipan over a cake of this height without cracks or ripples… especially not on the first try… (Unless you already know how to work with fondant, in which case I’m very jealous). Somewhere I saw a blogger suggest testing out your skills on an inverted bowl. This is a great idea… because, once you get whipped cream on your marzipan, you can’t re-roll it. And marzipan is too expensive to make that mistake with.
Remember, worse case scenario, you could always just drape the marzipan like a rippled curtain. And you can hide the wrinkly seams behind ribbon (as I did) or under some extra flowers – my friend says people put flowers and leaves (and even powdered sugar) all over their cakes in Sweden to hide mistakes.
“Att våga är att tappa fotfästet en stund, att inte våga är att förlora sig själv.”
“To dare is to lose your foothold for a moment, to not dare is to lose yourself.” (Strom, 1981)*
Oh, this week. This beautiful week of Swedish cooking.
As with all the “big hitter” countries, I entered this week with trepidation. It wasn’t because of the entree. I knew I’d make Swedish meatballs from the moment I began this Adventure.
No, the main reason I was a bundle of nerves had everything to do with a cake.
A cake!
I really wanted to make a Swedish Princess Cake, but I feared I’d screw it up. I asked you all on our Facebook Page, and so many of you voted that you wanted to see the real deal. Thank you for motivating me to go for it… for encouraging me to dare.
The recipes and meal review will be posted throughout the week.
Swedish Meatballs [Recipe]
Beautiful, tiny meatballs made with pork and beef, seasoned with a grated onion, cream, and a whisper of nutmeg. Served over buttered egg noodles with a cream gravy. And don’t forget the lingonberry jam. Amazing.
Swedish Princess Cake | Prinsesstårta [Recipe]
The epic, domed cake from Sweden, make with cake, whipped cream, raspberry jam, custard, and marzipan “fondant.” Boy, howdie. Those Swedes sure know how to party.
( Storsylen. Photo by Håvard Berland)
Are you a daring person?
Would you rather play it safe, or stretch out and risk losing your foothold?
While I haven’t been to Sweden, I have dated a Swede. And that just might be everything, ever.
At least, when it comes to Swedish food.
The one thing about dating a genuine Swede, is that you might begin to think you’re in Sweden for the duration of the relationship; their national pride and is that strong.
Especially if he still lives with his mother.
Sånfjällets national park. Photo by Jonny Hansson
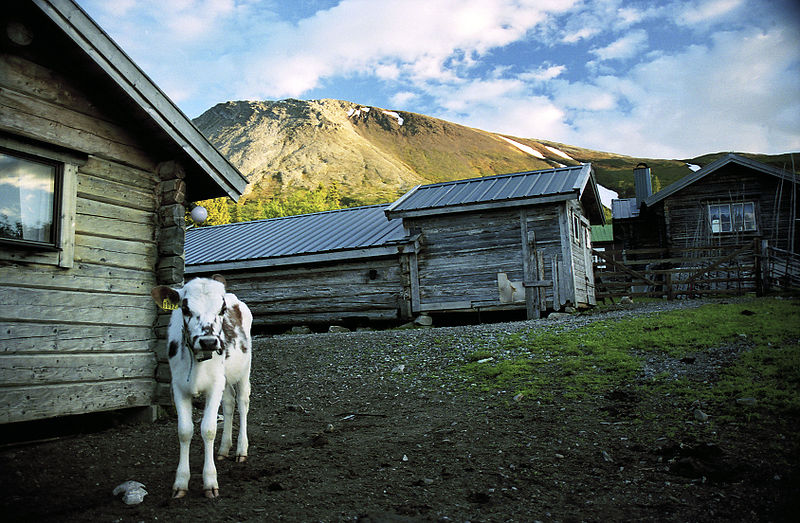
And why not? This is a stunning land, full of thick, verdant forests, airy, breathtaking mountains, and the crunch of snow. With a land this grand, no wonder the appetite is whetted.
At the time Daniel and I were dating, back when we were impossibly young (18, if I remember correctly), he was, in fact living at home.
One of my first dinners at his house involved steak tartar, with a raw egg cracked over the top. Pungent horseradish gratings were piled on the side. I’m not sure I impressed anyone with my squeamish hesitation, which resulted in my complete avoidance of the tartar.
Breakfast, if I happened to be there so early, involved sliced cheese on top of buttered rye bread… rather like a mini smorgasbord. Sometimes, instead of cheese, he added salami, or a round of some other, obscure cold cut. For someone, like myself, who was used to cereal or French Toast in the morning, meat and cheese was quite the departure, especially for my sensitive nose.
Stadshus Stockholm. Photo by Evunji.
And then there was his mother’s Swedish Meatballs [Recipe]. Oh, but those meatballs still give me dreams at night. She made them sometimes for our school lunches (there were only 18 of us in the class, so mothers often took turns making lunch, instead of running a standard cafeteria). She served them in a brown sauce, with buttered egg noodles. My Swedish friend, Alex, tells me that her mother always served her meatballs with potatoes. Either way, the key is to serve them with a healthy spoonful of Ligonberry Jam.
Stockholm, Sweden. Photo by Ellgaard Holger.
The desserts can be as simple as Swedish Crepes (which Daniel made a stack of for my birthday, and stuck candles in it), or as complicated as the beautiful princess cake [Recipe], a dessert from the 1900’s which includes marzipan, whipped cream, and raspberry jam.
There is so much more. But that is a snapshot into what I tasted, in another life, before I married my amazing husband and our beautiful daughter was born.
Swedish Maps and flag, courtesy of the CIA World Factbook.
P.S. Have you ever dated someone who showed you a new culture and foods?
Did they have an easier time convincing you to try their food because you were dating?
“The bee that is forced into the hive will not produce honey.”
This Swazi proverb has me thinking about what I do and why. When I used to work a desk job, I had a palpable limit to my energy and creativity: it was called “5pm.” The old song “It’s five o’clock somewhere” was my quitting time rhyme. I was out that door faster than anyone else and, in fact, I was unproductively waiting for the end of the day even before five o’clock.
But since I began cooking the world, something strange has happened. No longer am I watching the clock. No longer do I count the minutes down by the second.
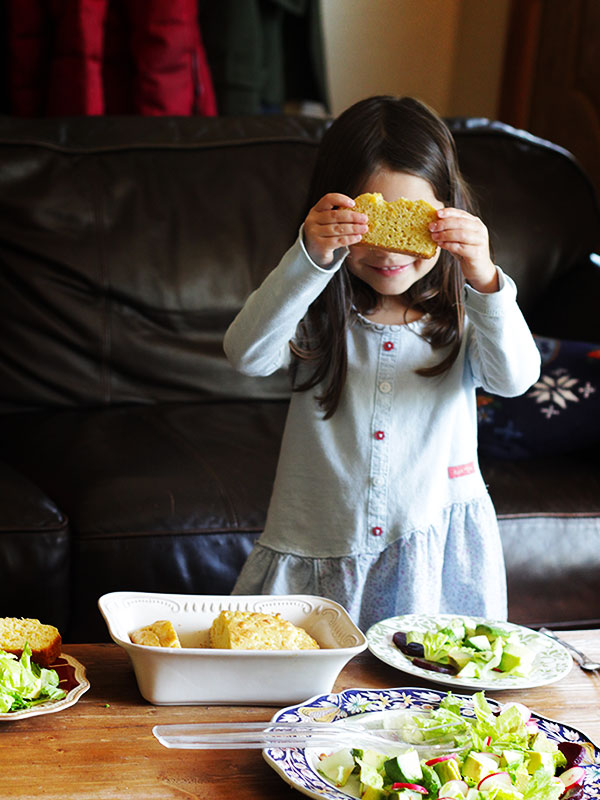
Instead, I have weeks like this one… our Swazi week … where I’m surrounded by the steam of the moistest corn bread I’ve ever had, reveling as I eat nearly an entire loaf by myself. Times when I fall into a tongue in cheek discussion with Mr Picky about how delicious beets are (I believe it, he doesn’t).
Where Ava tries radishes and loves them. Then hates them. Then loves them.
Then tosses it all away for Mealie Bread.
I lose track of time when we are caught up in the glory of discovery. Simple discovery.
The joy of it makes me push myself harder than ever before. And I’ve never been prouder of the work that I do.
It has everything to do with the Swazi proverb at the top of this page. This week, the Swazi remind me that we can only produce “honey” when we are doing what we believe to be our calling. When we aren’t forced into action.
And speaking of the work that I do, you are an important part of this Adventure. I’d love to get your input… Towards the end of this year, the original purpose of this blog – to cook a meal for every country in the world – will be wrapping up. I would love your input on what you’d like to see after the I reach the end of the countries… Maybe more of the same? Some global crafts? Video recipes? Any and all ideas are welcome. Thanks! xo
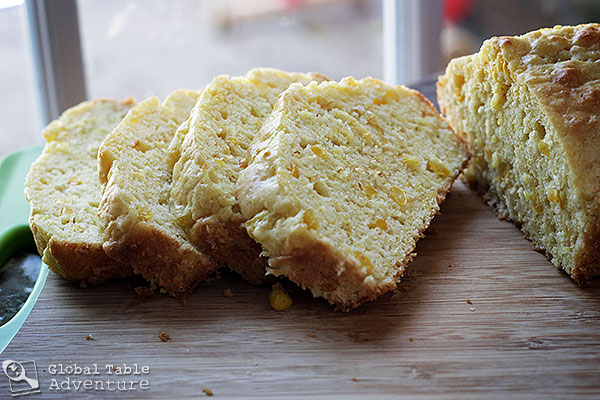
This is the best cornbread I’ve ever made or had. This is my new go-to cornbread. It was funny to watch Mr Picky prepare to eat it. He had a nonchalant, bored look… but then he took a bite and, with a slight raise of the eyebrows and upward curve of his lips, I knew he agreed with me. Mealie Bread is a special kind of corn bread, indeed. Ava gobbled it up, too.
What I loved least about this dish:
Nothing. Mealie Bread is 100% win. Especially with a bit of softened butter.
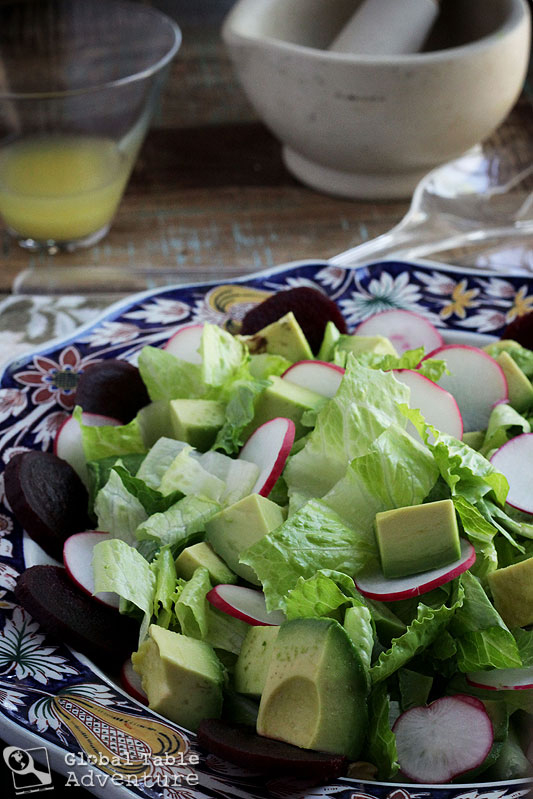
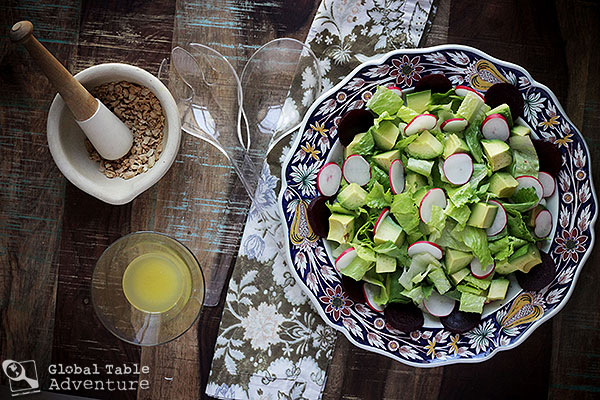
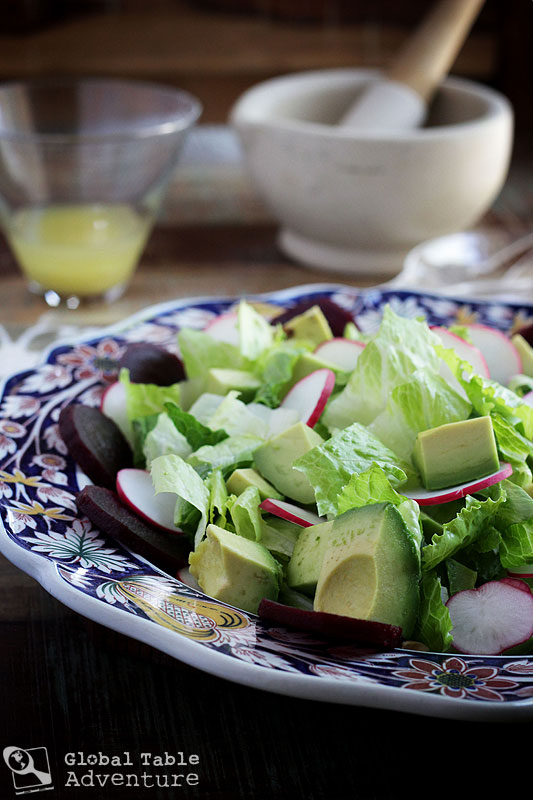
This was a fun, refreshing salad which happened to come together quite beautifully. I was pleasantly surprised that Ava tried the radishes, but disappointed she still wasn’t keen to try the beets. That being said, she was all about the “pink” avocados, that had been stained by the beet juice. I feel like somehow that’s a win, for the parent.
What I loved least about this dish:
Not much. If the lemon dressing is a bit sharp for you, you might try diluting it with some peanut oil… that captures the region’s love for peanuts, so it’s not straying too far from tradition. That being said, a squeeze of bright lemon juice with a healthy sprinkling of salt is the perfect topper on a hot summer’s day.
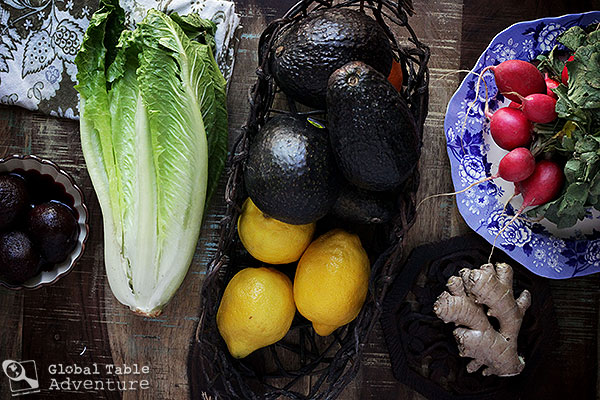
Swaziland’s swooping slopes are dotted with crops; it is here that the Swazi grow the freshest produce, from sunshine yellow lemons, to buttery avocados. With farming of that caliber, it should come as no surprise that Swazi Salads are especially grand.
This is not to say they are carefully composed salads. (Most things that are careful, aren’t nearly as delicious.) No, these are simple, heaped piles of chopped veggies. But you can get them on the side of even the most humble plate of beans, which counts for, well, everything.
There’s no elaborate dressing, save, perhaps, a squeeze of lemon juice and fresh grated ginger. Croutons? Forget it. The crunch you seek comes from a handful of crushed peanuts and the crisp bite of a sharp radish.
Feeling bold? Add minced hot peppers to that lemon juice.
Fresher and brighter is the name of the game.
So what’s in a Swazi Salad?
Every time I looked up Swazi salads, I happened across some combination of avocado, lettuce, onion, and beets.
Beets were everywhere: red heaped piles of shredded beets, beet jelly with corn in it, sliced beets. Just look at this Swazi Food Recap.
I also found a fun avocado and radish salad topped with a squeeze of lemon juice, fresh grated ginger, and crushed peanuts from The World Cookbook for Students.
In the spirit of salads everywhere – the “toss what you have together”variety – I combined the ideas and came up with a beautiful, nutritious salad, or “Slaai” as they call it in Swaziland.
While there’s clearly no exact recipe for a Swazi Salad, here’s the combination of ingredients I liked:
Serves 4-6
Ingredients:
For the salad:
1 large avocado, cubed
1 head romaine lettuce, chopped
2-3 cooked, sliced beets
2-3 sliced radishes
1/4 cup crushed peanuts
Combine all salad ingredients. Drizzle with a bit of the dressing. Place remainder on the table for diners to add more, as desired.
Smile.
Swazi Boy. Photo by Jenny M. Buccos.
Swazi Salad | Slaai
Votes: 0
Rating: 0
You:
Rate this recipe!
Print Recipe
Every time I looked up Swazi salads, I happened across some combination of avocado, lettuce, onion, and beets. Beets were everywhere: red heaped piles of shredded beets, beet jelly with corn in it, sliced beets. Just look at this Swazi Food Recap. I also found a fun avocado and radish salad topped with a squeeze of lemon juice, fresh grated ginger, and crushed peanuts from The World Cookbook for Students. In the spirit of salads everywhere – the “toss what you have together”variety – I combined the ideas and came up with a beautiful, nutritious salad, or “Slaai” as they call it in Swaziland.
Every time I looked up Swazi salads, I happened across some combination of avocado, lettuce, onion, and beets. Beets were everywhere: red heaped piles of shredded beets, beet jelly with corn in it, sliced beets. Just look at this Swazi Food Recap. I also found a fun avocado and radish salad topped with a squeeze of lemon juice, fresh grated ginger, and crushed peanuts from The World Cookbook for Students. In the spirit of salads everywhere – the “toss what you have together”variety – I combined the ideas and came up with a beautiful, nutritious salad, or “Slaai” as they call it in Swaziland.
Combine all salad ingredients. Whisk together salad dressing and drizzle over the salad. Place remainder on the table for diners to add more, as desired.